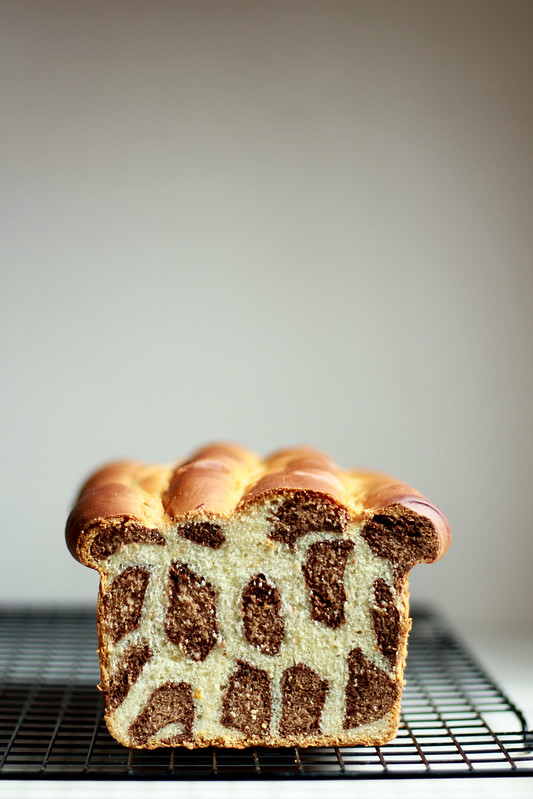
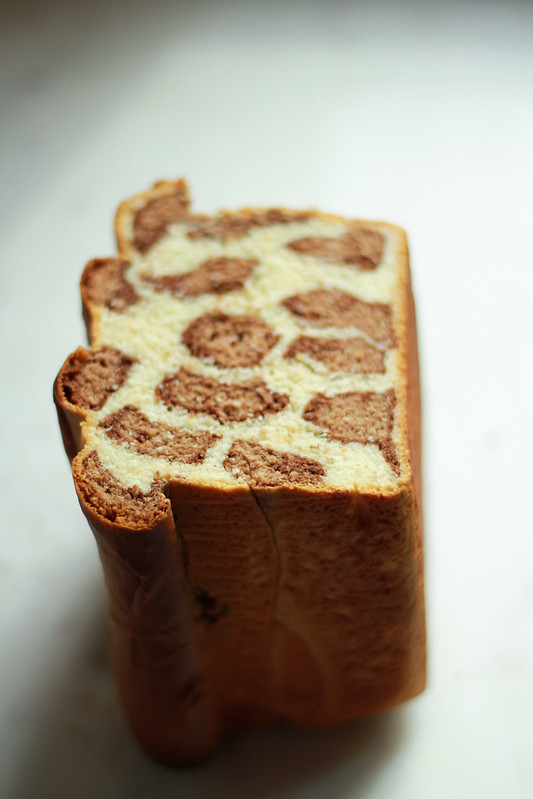
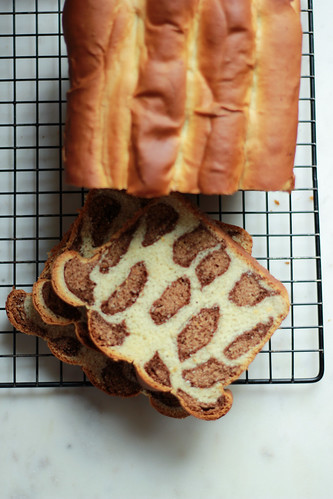
This bread has been on my mind for atleast 3 years now. Everytime I've seen it, I wanted to try making it at home. Somehow, it got pushed until yesterday. There are so many different ways that you can make such breads and this is the most easiest pattern. Atleast that's what I think.The delight & excitement that I felt while slicing into it was incomparable! I really felt like a little child then. I must also mention that this recipe is eggless and does not use any food colouring!
This bread is sweet,not very sweet but it is sweet if you compare it with storebought bread. I somehow felt that it's a cross between a cake & bread. The entire process of making this bread using
this recipe was fun for me. I feel it would make a perfect activity for kids especially on a rainy /snowy day. Talking about snowy day...we are having a snow storm right now. Just when it touched 68F the other day and after 3 weeks of good weather...when the trees and plants have started to sprout! Hmm...that's how our sweet Minnesota is...unpredictable! I still remember the weather on Ian's First birthday party. It's usually pretty hot in July but that day, it went down to 40's! We had the party outdoors in a park and all of us ended up wearing jackets!
Getting back to this wonderful bread...try it on a day when you need a 'pick-me-up'. It will definitely make your day! I don't know how it will taste if you omit the orange from this recipe. Initially, I did not want to but after tasting it, I felt that it was a good addition. It could be because I like orange in my baked goodies. I do not enjoy fruit filled chocolates though. I can never get myself to like them.
When you read the instructions below, it can look a bit confusing at first. It's one of the simplest things to make in reality. You make one dough, divide it into three. Then you are basically rolling them and wrapping them around each other to form a sausage shape. Then you further roll them into long ropes, cut it, stack it and bake. You don't even need an egg wash for the top! It gets golden as it bakes.
CHOCOLATE & ORANGE LEOPARD BREAD
Makes one loaf
Ingredients:
1 cup warm milk
2 tablespoons (25 g) cornstarch
1 1/2 tablespoons (15 g) yeast
2/3 cup (70g) sugar, divided
4 tablespoons unsalted butter, melted & cooled
1 teaspoon vanilla
2 tablespoons orange zest
3 cups (375 g) all purpose flour
Dark chocolate paste:
2 tablespoons cocoa
1 tablespoon milk
Light chocolate paste:
2 teaspoons cocoa
1 teaspoon milk
Method: In the bowl of your standmixer using a dough hook, whisk together warm milk, cornstarch, yeast, 2 tablespoons sugar and set it aside for 6-8 minutes till it turns frothy. Add the melted butter,orange zest, vanilla extract and turn on the mixer on low speed. Add the flour by the cup and let it mix on medium high speed until it forms into a dough. Turn off the mixer and let the dough rest for 10 minutes. Then turn the mixer on high speed and knead for 8 minutes. Divide the dough into two equal portions. Let's name it A & B. Divide B two equal portions. Now you are left with three dough balls. A, B & C.
Make the dark & light chocolate paste by mixing together the given amount of cocoa and milk in a small bowl. Tint dough B with dark paste and dough C with light paste. You may have to knead the dough for 2-3 minutes by hand to get them in a uniform colour. Wrap A, B & C in plastic wrap and chill for 1 hour.
After 1 hour, take out the dough balls and further divide each into 7 equal portions. So now you have 21 dough balls.
Using your hands, roll out the light brown dough into hot dog shapes, about 4 inches long. Set them aside.
Using a rolling pin, roll out the dark brown dough into a flat oval and wrap each of them around the light brown hot dog shapes. Use water to seal the edges.
Using a rolling pin, roll out the white dough into a flat oval and wrap each of them around the dark & light chocolate rolls. Use water to seal the edges.
Now you have 7 tri-coloured rolls. Using your hands, roll each of them into atleast 14-15 inch long ropes and cut them into the two. You will be able to see the beautiful pattern now.
Transfer them into a lined 8 X 5 inch loaf tin by stacking them on top of each other. Cover it with a tea towel and let the dough rise until doubled, till the top of the tin.
Preheat the oven to 375F and then reduce it to 350F as you put the bread in. Bake for 35-40 minutes. Let it cool in the tin for 5 minutes and then unmould the bread and let it cool completely on a wire rack.
Slice and enjoy!
I've tried my best to simplify the instructions. If you have any questions, do let me know in the comment section below.
We really enjoyed the bread. Ian was the only one who didn't like it. I am guessing he didn't like the chocolate-orange combination. Other than that, I must say it was a success! Zara calls it the Tiger Bread! :-) I cannot wait to try other designs now. It's really an exciting process, you should try it to experience it!


 Makes 8