Ria's Collection: January 2011

Monday, January 31, 2011

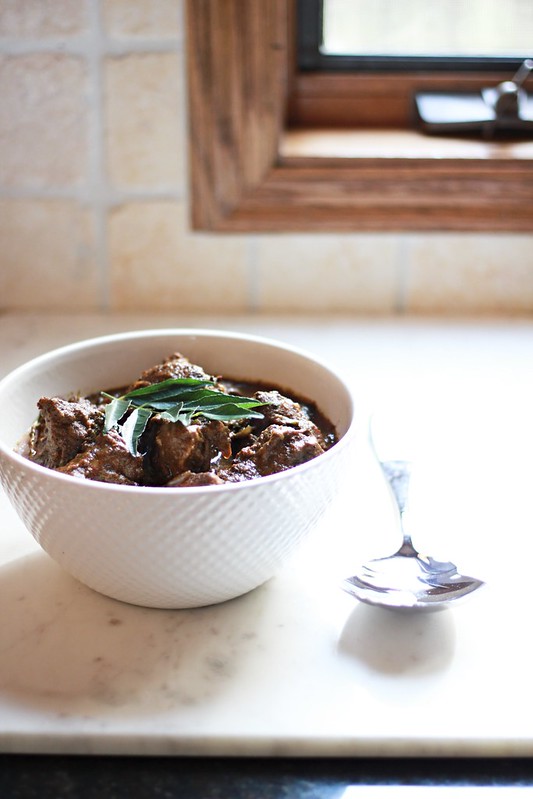
MURGH METHI MALAI

IMG_0630
There are certain things only another food blogger can understand. Anybody I  come across with a recipe can inspire  me :) The story behind this curry is a perfect example for that. I am very active on Facebook so is Bindu chechy. We met over FB although she is not a food blogger we get along really well. I think we have a conversation or two on a daily basis.It was during one such conversation that she happened to mention about her Methi Malai Chicken and I shot her a message instantly asking her for the recipe. I so bless that day!

'...you'll need one chicken all cleaned up & cut into pieces.Make this in a pressure cooker as it yields a smooth gravy.Pour enough oil in the cooker & fry two chopped medium onions well after adding a pinch of salt to it,add about 3 big spoons of ginger,garlic,green chillies paste & continue frying. To this add about 3 cups of washed & drained methi leaves(fresh) & saute till wilted.Add the washed chicken & all the dry masala,coriander,jeera,garam masala & turmeric powder & fry for a few minutes.Add four big spoons of whipped yoghurt & cook for a couple of mins.Add little water if required & pressure cook till done.Open the cooker as soon as the pressure goes down & add a small can of malai(cream-I use nestle) & stir nicely.Serve hot.It's really yummy.Since there's no red chilli powder added make sure to use enough green chillies to suit your taste. Let me know once you make it.Just warm it gently after adding the cream to incorporate & you can add tomatoes cut into chunks also as you close the cooker to cook the chicken! The final product should be a tangy,flavourful one with gravy'...said she.


For me, to make a curry or something, I just need a 'frame'of recipe and I can build upon it I waited to get hold of some nice fresh Methi/Fenugreek leaves to make this curry. Yesterday when we went grocery shopping, I bought a bunch of good looking methi and the fate of that chicken we just bought was sealed. Murgh Methi Malai  & Poori (unleavened deep fried Indian bread) it was!
IMG_0633

This is the first time I am cooking with Fenugreek leaves. I have heard how bitter they can be, so I took  a precaution by soaking the leaves in some salt water for 10 mins. I have mentioned it in the recipe also, just in case people just rush through this part :) You need not use the pressure cooker, you can use a regular pan as well. Pressure cooking makes things a bit quicker, that's all :)

IMG_0630


MURGH METHI MALAI
Recipe inspired from Bindu


Ingredients:
1 whole chicken, cut up into 18-20 pieces, washed.
2 large red onions, finely sliced
3 tbsp ginger garlic paste
12 green chillies, ground to a rough paste
1 1/2 tbsp coriander powder
1/2 tsp turmeric powder
1 tsp garam masala
1 bunch fresh methi/fenugreek leaves*
2 medium tomatoes, chopped
5 tbsp plain yoghurt, whisked well
4 tbsp heavy cream/Amul cream
Salt to taste
Oil- 3 tbsp

*Water- 1/2 cup

Method:
*Soak the fenugreek leaves in some water + salt  for 10 mins. Squeeze out the leaves and then wash again. This takes away all the bitter taste from the leaves.
*Wash the chicken well. If you are draining it, you will have to add the mentioned water. If not, the chicken will leave enough water for the gravy.I usually don't drain the water from the chicken. This curry should be creamy and not watery, so please keep that in mind when you add water.

Heat oil in a pressure cooker. Add the sliced onions plus some salt and saute till they become soft.
Add the gingergarlic paste and green chillies and saute for almost a minute.
Add the powders and mix well. Add in the leaves and give it a good mix till they wilt.
Add in the chopped tomatoes and mix. If you want, you can mush up the tomato pieces with the back of your spoon.
Add in the well whisked yoghurt and mix quickly so that it doesn't spilt.
Add in the chicken pieces and brown the pieces. Cover and cook for 1 whistle.
Let the pressure go down on it's own. Open the lid and add in the cream.
Check for salt and serve hot with rice/chapathi/parata/poori/bread...or eat it plain! :)
IMG_0626


Verdict:  We both lost track of how many Poori's we ate because of this wonderful wonderful curry! It is really a very very delicious creamy curry. Try it for yourself and see! :-)

Thursday, January 27, 2011

BISCUIT JOCONDE IMPRIME/ENTREMET - MOCHA BAVARIAN CREAM GATEAU

DB cake

This time I knew I had to do the DB challenge not because it was a cake, but it was something which I had been planning to do this month,otherwise. Then when the DB challenge was announced, I was so thrilled that I almost bounced off the walls. I love trying different techniques, different filling ...basically anything different,everytime! I had written down the recipe for a ribbon strip from the Le Cordon book of Baking and used to show it to Jobin saying this was something I always wanted to try.A Joconde Imprime is a decorative design baked into a light nut-sponge cake providing an elegant finish to desserts/tortes/entremets formed in ring molds.
DB cake 1

The first time I ever saw that strip was on a Sweet Chariot's Chocolate Mousse Cake which was almost 8 years ago and my hunt for that 'strip' recipe started right then and it ended in December '10! I had asked many people on how to bake it and I got various answers which included 'spray painting' a sponge sheet cake! I thought, maybe that was it and I have no measures to spray paint a cake at home, so forget it! But I didn't forget it. I hunted our local library for books which could give me some hint to it and I finally found one...and I made up my mind that I am not letting that book go!
IMG_0415

The January 2011 Daring Bakers Challenge was hsoted by Asteroshe of the blog Accro. She chose to challenge everyone to make a Biscuit Joconde Imprime to wrap around an Entremet dessert.

DB cake 2


BISCUIT JOCONDE IMPRIME /ENTREMET - MOCHA BAVARIAN CREAM GATEAU
Recipe for the Cigarette Batter & Joconde -Pastry & Sports
Recipe for the Chocolate Genoise - from here
Recipe for the Mocha Bavarian Cream -Le Cordon Book of Professional Baking by Wayne Gisslen, pg: 534

Ingredients:
For the Cigarette batter:
30g softened unsalted butter
30g powdered sugar
1 egg white
20g flour
6g cocoa powder

For the Joconde:
75g ground almonds
75g powdered sugar
20g flour
2 whole eggs
30g melted butter
2 egg whites
12g sugar

For the Chocolate Genoise:
Look here.

For the Mocha Bavarian Cream: (I made 1/2 portion)
22g powdered gelatin
150ml cold water

3-4 large egg yolks
125g granulated sugar
500ml milk
8ml vanilla extract
1 1/2 tbsp instant coffee powder

500 ml heavy cream/Amul cream


For Chocolate Ganache:
125g semisweet chocolate/dark chocolate
125 g heavy cream/ Amul cream
IMG_0413

Method:
For the Cigarette batter:
Beat the sugar and softened butter together till fluffy.
Beat in the egg white and add flour and cocoa to it.Mix well.
Spread this batter on a parchement paper and make designs on it using your fingers/forks/pastry combs etc.
Freeze this for 15 mins. DO NOT skip this.

For Joconde:
Beat the egg whites stiff by adding the sugar (granulated) towards the end. Reserve.
Beat almonds,sugar,flour,whole eggs together till fluffy and add the melted butter.
Fold in the egg whites carefully and pour this batter over the frozen cigarette batter.
Spread it to an even 1/4" thickness.
Bake in a pre-heated oven at 475F/250C for 7 minutes. The cake should spring back when touched lightly.
Let it cool for 5 mins and then carefully transfer it onto a chopping board and trim as needed to fit your moulds.

For Chocolate Genoise:
Look here 

For Mocha Bavarian Cream:
Soak the gelatin in cold water and let it bloom for 5-6 minutes.
Whip the yolks and sugar until light and thick.
Scald milk and slowly add it into the egg mixture,beating constantly.
Cook this mixture over a water bath until it thickens slightly.
Add vanilla extract and coffee powder and mix well to dissolve.
Melt the gelatin and add into the egg mixture.
Let it cool over ice or in the fridge till half set, making sure to stir in every now and then to keep the mixture smooth.
Whip cream to soft peaks,DO NOT over whip.
When the egg custard has thickened, and not yet set, fold in the cream.
Pour in between the cake layers (as mentioned in the 'assembly' below).

For Chocolate Ganache:
Chop the chocolate into small bits and reserve in a stainless steel /glass bowl.
Bring the cream to a boil and pour over the chocolate.
Let it sit for 5 mins. Stir till it is smooth. It will be loose now, you can leave it in the fridge for 10 mins to get it slightly thickened.
Pour over the cake and smoothen it with an offset spatula.

Assembly:
1.Make a soaking syrup: Make a soaking syrup by dissolving 1cup granulated sugar in 1cup warm water. Add 1 tbsp of rum to it, if you wish to. I added it because I like the combination of rum and coffee.

2.Split the Chocolate genoise into 3, horizontally.

3.Cut the joconde into the size of the springform pan (diameter) to fit snuggly. There should be no gaps.

4.Place a layer of genoise at the bottom and soak it generously with 1/4 c of soaking syrup. Top it with half of the bavarian cream. Repeat. The last layer should be the genoise.

5.Top it with chocolate ganache and level it using a spatula, preferably offset.

6.Wrap the whole assembly with a cling film and let it set in the refigerator for 2 hours.

7.Decorate the top of the cake as you need and serve chilled.

This cake lasts really long, we had it for over a week! :)
DB cake 3

Verdict:
I made this cake in one go and it took me 4 hours. I wanted to finish it by the time Jobin got back home from work, so that I could surprise him and indeed he was surprised! ' Mmmm...no one would believe that it's made at home!' was his comment as soon as he took a bite of it.That was enough to keep me going for another week! :-D

It was a very very delicious cake! We couldn't help but dig into each other's plate for an extra bite. The filling was a breeze to make and it was very tasty! The Joconde Imprime gave the cake a very professional finish.

This is one of the best gateau's I have made till date! It is definately a lenghty recipe,but it's really easy to make.If you plan ahead,unlike me, you can make the cake on the previous day, wrap it well and leave it one the counter. Next day start with the joconde, cream and the ganache. If you happen to make this cake, trust me, you will be hooked to it! :)


Monday, January 24, 2011

STAR GOOSEBERRY CHUTNEY & SEASONED BUTTERMILK makes a delicious lunch!

IMG_0276
We usually cook 'Sona Masoori' variety of rice for our lunch everyday. That's not the rice I have grown up eating but I have no problems with it because I was used to eating it in my hostel so it goes down well with me. A few days ago, I had a strong inclination towards the 'chommanri choru' /Kerala fat red rice and made a small portion of it. When I have that rice, I want everything 'naadan' which goes perfectly well with it. So I made some Chicken Cutlets, a Chutney , some seasoned buttermilk plus a Cabbage Thoran. I was very satisfied...I almost licked my plate clean! :)
IMG_0231 

We usually buy our seafood from an Asian store and they are loud,messy but filled with every Asian thing you can think of! That's when I saw a bottle of Star Gooseberry in saline. I immediately grabbed a bottle and waited to get back home so that I could break open the bottle and eat. Unfortunately,it was sweet...yes and I was thoroughly dissapointed. I was warned by my friends that these things could be sweet so I did check the label in the stor...but there was no sugar mentioned anywhere!
IMG_0267
Anyhow, I drained out all that liquid and put back some fresh water and also added a few spoonfuls of salt hoping the sweetness would reduce somehow.Luckily it did and I made good use of it by making a chutney/chammanthi with it.
IMG_0277STAR GOOSEBERRY CHUTNEY /ARI NELLIKKA CHAMMANTHI
My own recipe

Ingredients:
1 c Star gooseberry in saline.crushed and seeds removed
1/2 c shredded coconut
5-6 green chillies or to taste
1/2  large red onion,chopped
1/2" piece of ginger
Salt to taste

Method:
Pound everything using a mortar - pestle, adjust seasoning as required.
Form them in to a ball and serve with rice.

Seasoned Buttermilk

Seasoned buttermilk was a natural choice to go with a spicy dry chutney. The combination of rice and these sides are delicious and too hard for me to give a pass, anytime.

IMG_0266SEASONED BUTTERMILK / PACCHA MORU
My own recipe

Ingredients:
1c lowfat plain yogurt ( You can use any plain yogurt)
1" piece ginger
4 green chilles
3 curry leaves (not sprigs, but leaves)
1/4 large red onion, chopped
1c water
Salt to taste

Method:
Bruise ginger,green chilles, curry leaves and onions using a mortar pestle.
Whisk yoghurt and water together.
Add salt and the crushed ingredients.
If your yoghurt was thick, you may have to add more water to thin it.
Adjust spice if needed.
Serve chilled with rice.

IMG_0275
Verdict: A happy 'burp' says it all! :)


I am sending all these yummilicious goodies to Kerala Kitchen, a monthly event Magpie and yours truly are hosting.So, once again, if you guys are making or already made some Kerala goodies, do not forget to send it to magpiemails AT gmail DOT com.

Friday, January 21, 2011

VANILLA PANNACOTTA with POMEGRANATE SAUCE

Vanilla Pannacotta
It's official, I love pink! Whenever I go shopping, be it anything, I end up picking something pink. Usually pink is associated with 'being girly' but I don't think I am that girly to begin with. Sometimes I like the vintage look, sometimes contemporary and sometimes even bohemian! It all depends on how I feel right then. When I made this dessert, I wanted to dress it up with something colourful and bright! I searched in my refrigerator for fruits and I found apples, oranges, banana's and a pomegranate.

Apple sauce? No way! Orange sauce? Yes! So I grabbed the bag of oranges dreaming of my Orange-Blackberry sauce I made last summer to go with my My Fair Lady Pudding.Sadly most of them were beginning to rot! Then all I was left with were banana's and a pomegranate. I  have never heard of a banana sauce nor pomegranate sauce before but I chose the latter because of it colour and because it's one of my favourite fruit! So pomegranate sauce, it is!

Vanilla Pannacotta
We usually have a dessert almost after every meal, except brekky. It need not be anything elaborate, even a piece of Chocolate & Cashewnut Fudge or a Simple Cherry Crumble  would do...but we need something sweet. So that gives me the excuse of stocking up almost once in 3 days and I don't complain about it! :)

Pannacotta in Italian means 'cooked cream'.This dessert is generally from the Nothern Italian region of Piemonte,although it is eaten all over Italy and is usually served with wild berries,chocolate sauce or fruit coulis -source Wikipedia
Vanilla Pannacotta

I have never made a Pannacotta before but when I tasted it in Napa Valley, California,I knew I had to try it at home sometime. It was such an easy thing and hardly takes anytime! So if any of you haven't tried this delicious creamy dessert at home before, try it now...or else you are really missing out on certain good things in life :) This is one of those desserts which you can make in less than 10 mins, that is, the active cooking time.

Vanilla PannacottaVANILLA PANNACOTTA with POMEGRANATE SAUCE
Recipe credits
For Pannacotta- Finla of My Kitchen Treasures
For Sauce - Your's truly
Ingredients:
For Pannacotta:
1c milk
1c heavy cream
1/2 c granulated sugar
3 tsp powdered gelatin
2tsp water
2tsp vanilla extract


For Pomegranate sauce:
1/2 a large pomegranate, seeds only
2tsp cornflour/cornstarch
1/4 c water
Sugar to taste
Vanilla Pannacotta

Method:
For Pannacotta:
Sprinkle the gelatin over cold water and let it bloom for 5 mins. Meanwhile get the other things ready.
Mix the milk,cream & sugar in a sauce pan and bring it to a boil.Switch off the flame.
Melt the gelatin in the microwave oven for 12 seconds. Stir well.
Add the vanilla extract and melted gelatin into the milk -cream mixture and stir well.
Pour into ramekins or any other glass bowls (it's easy to release) and let it set in the refrigerator for a minimum of 3 hours.


For Pomegranate sauce:
Puree the pomegranate seeds.
Add water, sugar to taste and the puree in a saucepan and bring to a boil.
Add in the cornstarch and let the sauce thicken.
Once it's thickened slightly, take off the flame and let it cool completely.
Day 13-Assassination of a delicious dessert


Serving suggestion:
You can demould the dessert by dipping the bowls in hot water for less than a minute. The dessert will easily slide out of the bowl,onto a serving plate.
Pour the sauce over it and sprinkle some pomegranate seeds and garnish with a sprig of mint.


Verdict: Deliciously creamy smooth dessert with a slight tang from the beautiful sauce.You must serve these in small quantities as they are quite rich. A must have for my party menu next time on! :)

As most of you have seen on the top of this blog, my blog has been nominated for the Best of Indian Blogosphere 2010-Food Blogs, so please take your time and vote for me. Scoll up and look on the right hand sidebar and make sure you vote for my blog. Thank you! :)

Happy Friday!

Tuesday, January 18, 2011

CURRIED CHICKEN PUFFS with HOMEMADE PUFF PASTRY

Chicken Puffs
There could be certain small things which reminds you of your hometown bakeries,even if you are lost among modern decor and high end coffee shops, right? For me, these tiny things are things like puffs especially motta puffs (egg puffs),paper-il pothinja cake (sponge cake in candy wrappers), variety of biscuits (cookies are called as biscuits in India) and a lot of other sweet and savoury treats. I'm sure we can try and make them at home, but we might miss out that authentic taste of it. I really wanted to eat some 'nadan' chicken puffs sometime last week and I did, as you can see :) When I was a kid, I used to think, puffs were deep fried because they were oily! Now, I know how :)
Puff Pastry
When I was in India, I used to long to see readymade puff pastry in our local supermarket. Unfortunately, we never got any of those stuff and I am pretty sure we never will! :-) I used to dream then, of pushing my cart around each aisle and pulling out everything I wanted from the shelves.I still dream but certain conditions do apply! I keep telling myself,'Don't get used to readymade puff pastry or pie crust,when you go back to India, you will be denied of such luxuries'! For people here, it's not a luxury, but for people like us, yes it is. Ummm...they say,'Make hay while the sun shines'! and here I am making sure the hay doesn't get too dried fearing the days when there will be no sunlight.
Chicken Puffs

I made this batch of puff pastry way back in July and froze it. I completely forgot about it till I cleaned my freezer  and there it was, well wrapped and frozen like a brick! I was not sure whether it will thaw successfully. Luckily it did and I baked a sample batch. The pastry puffed up so beautifully and filled our little apartment with a wonderful aroma.

I used a leftover chicken curry as  filling.You can use whatever you like.

Chicken PuffsCURRIED CHICKEN PUFFS with HOMEMADE PUFF PASTRY
                                      
HOMEMADE PUFF PASTRY
Recipe taken from Baking with Julia by Dorie Greenspan,page no:46
Original recipe belongs to Michel Richard

Ingredients:
2 1/2 c unbleached all purpose flour ( You can use all purpose flour/maida too)
1 1/4 c cake flour ( To make cake flour at home: For 1 cup of cake flour , use 3/4 c all purpose flour with 2 tbsp cornstarch/cornflour)
1 tbsp salt
1 1/4 c ice water
4 sticks/1 lb/454 g of very cold unsalted butter
Chicken Puffs

Method:
Mixing the dough:
Put the all purpose flour, cake flour and salt together and whisk together.
Add all the water at once and mix till it forms a ball. You can use a food processor for these steps. The dough will be very moist and pliable and will hold together when squeezed between your fingers.
Remove the dough from the machine,form into a ball,and, with a small sharp knife, slash the top in a tic-tac-toe pattern.Wrap the dough in a damp towel and refrigerate for 5 minutes (don't skimp on it!).
Meanwhile place the butter between 2 sheets of plastic wrap and beat it with a rolling pin until it flattens into a square that's about 1" thick.Take care that the butter remains cool and firm; if it has softened or become oily, chill it before continuing.

Incorporating the butter:
Unwrap the dough and place it on a work surface dusted with all purpose flour.With the rolling pin,press on the dough to flatten it and then roll into a 10" square.Keep the top and bottom of the dough well floured to prevent sticking and lift the dough and move it around frequently.Starting from the center of the square, roll out over each corner to create a thick center pad with "ears" or flaps.
Place the cold butter in the middle of the dough and fold the ears over the butter, stretching them as needed so that they overlap slightly and encase the butter completely.You should have a package that's about 8" square.

The dough must be cold at all times. If your room is warm and you feel that the butter has softened,wrap the dough with a plastic wrap and chill it.

Making the turns:
I don't think I can do justice to you guys by typing out the method, so why don't you all go ahead and watch Michel in action? Do come back

Freezing the puff pastry:
It can be frozen at any stage, ideally after completing the six turns,roll it out into a flat sheet, chill it on a parchement -lined baking sheet ,and then, when it is cold, wrap it for freezer. I didn't do any of that, I just wrapped the dough (after 6 full turns) in cling film and then packed it in a ziplock bag and froze it for more than 6 months! :)
When you need to use it,thaw the dough, still wrapped , in the refrigerator.

Chicken puffs

How I made the Curried Chicken Puffs:
Since I froze the pastry in bulk and not the sheet form, I let it thaw on the counter in room temperature. Use any chicken/vegetable filling of your choice.

Pre-heat the oven to 425F/220C and position the rack in the middle.
Dust your work surface with flour, lightly.Cut out a small portion of the puff pastry and roll it out into 1/4" thickness, evenly. Try to keep it in a rectangular or square shape to avoid wastage.
Divide them further into squares using a sharp knife.Keep the filling in the center ,fold over and seal the edges using water. Place the filled pastry on a parchment/butter paper lined baking sheet.
Beat a whole egg and brush lightly on top of the filled pastry and bake for 25-30 mins or till the top is nice and golden.
Let it cool slightly as it gets crunchy when it cools.

If you are looking for some chicken filling ideas, you can have a look at my Kuttanadan Chicken Roast & Indian Samosa!


Verdict: It cannot get any more perfect than this for me, I am sure. It had such a wonderful crunch and the filling complemented really well. Jobin loved it and gave me a big thumbs up! Every evening after I made it, for almost a week, he used to come back from work and ask me for these crunchy puffs :)

Please don't go by the length of the recipe, it's really easy and the results are mindblowing! So get your rolling pins out, people! I am making another batch of puff pastry this week :)

I am sending these delicious Curried Chicken Puffs to Kerala Kitchen - a monthly event co-hosted by my dear blogger friend 'R' of  Magpie's Recipes and yours truly.So every time you make a Kerala 'inspired' dish, think of us, think of our event and send your entries to magpiemails AT gmail DOT com and make this event a success! There are many badges (Top Dish,Best Pic & Top Contributor )awaiting you!

Wednesday, January 12, 2011

BAKED CRISPY APPLE CHIPS...totally healthy!


I remember telling you not so long ago that I totally hate any form of baked apples. Remember? Ever since that day, I have been hooked onto these crunchy crispy apple chips! They are so easy to make and they are baked! Yes, not deep fried! How soothing was that to your ears? :-) I am a big lover of anything deep fried, especially potatoes! But if you get a bite of these crispy chips, you will never want to go back to deep fried snacks because it tastes as good as it looks. It is healthy too! So all in all, they are wonderful !

Ah, I forgot to tell you that you  will not feel heavy after eating these. Instead you will not stop at one...but eat a whole plateful of it! :-) You will need some patience for this to get baked as it is baked in a very low temperature which helps in maintaining the colour and also it's taste. I used Granny Smith Apples (the tart, green apple)  but you can use any variety as long as the apple is firm to touch. Having a mandoline (slicer) will help tons, but if you don't , you can put your slicing skills to a test. Just be careful when you slice it because we need it thin, as possible. I feel, halving the apple or even quartering them will make it easier as we will have a better grip on it.Also, keep the skin on,don't peel them away! :-)

When I first tried baking them at home,I was impatient and went ahead with a slightly higher temperature and the chips were kind of burnt. So, try and stick with the lower temperature.All thanks to Archana for the tips :) I am always inspired by her photographs and tried to click on the same lines this time...but her's is definately much better :-D


BAKED CRISPY APPLE CHIPS


You will need:
Apples (any firm variety,I used Granny Smith)
Slicer
Parchment paper
Baking sheet
Cinnamon powder (optional)

Method:
Pre-heat oven to 200 F which is appox. 93C and position rack in the centre.
Wash the apples and slice them fine (with or without seeds). I sliced it with the seeds,hence the beautiful design in the centre.
Lay them on a parchment lined baking sheet making sure you DO NOT overlap the apple slices.
Bake them for 1 hour 15 mins or till they turn pale brown (as you see in the pic) and crisp. It will get more crisp once cooled.
Cool the baked chips completely.
Sprinkle them with cinnamon powder (optional) and store them in airtight containers.


Verdict: We thoroughly enjoyed this healthy treat! It's perfect for tea time or to munch while watching TV. I couldn't stop admiring how cute the chips looked. Everytime I look at the first picture, it reminds me of a flying skirt! :D

Try these wonderful chips at home and stay healthy!


Monday, January 10, 2011

COCOA BROWNIES WITH CRUNCHY MACAROON TOPPING


One of the best things living in Minneapolis so far is that I got to meet and greet some of my favourite people. When I say my favourite people (in this context), they are not my family, but friends through blogging. Earlier last year, I met Zoe & Jeff of ABin5 fame. I went for their bread baking class on Healthy Bread In 5 Minutes a Day and it was fun!!A few weeks ago, I met Alice Medrich.She was on a tour for her new book Chewy Gooey Crispy Crunchy Melt-in-your-mouth Cookies and Minneapolis was her first stop.When I got to know about it, I booked my seat right away because I couldn't wait to hear that they are sold out.This happened in July. The class was in November :-D I just couldn't risk not being there when she was in town!!

 So, that Nov.15 evening, Jobin said he would get back home as soon as possible from work,so that he could drop me at the cooking school. Everything went smooth. I checked my bag for my camera and pen. Everything was in place. All we need to do was to leave. And we left for the school.It is just a 15 minute drive and it's a road that we are very used to. We even got onto the HOV (special lane for cars with 2 or more people in it) to avoid the after-office- hour traffic. Everything went smooth till we took the wrong exit! My hands went cold. I just didn't want to be late, atleast that day. I kept calm because I could see the worry on his face. Poor thing, he knew how much I had longed to be a part of Alice's class and I had been waiting for months now! I said, 'It's Ok,as long as we get there before the class gets over'.

Finally we reached there, maybe 10 mins late.He left me on the sidewalk and I ran. Yes,I ran on the slippery pavement (it snowed the night before). I felt I was running,but later he said, 'I thought you'd run to the class, but you just walked!'. So, maybe I was running inside :-)
Here's some cookies that she made for us ME! :)


Meeting Alice was definately a blessing, because I am a true fan of hers. I simply love all her books and the way she takes us through each of the steps.She is such a lovely lady to meet and greet.I shouldn't forget to mention...her recipes are fool proof! Here are some of her pictures, in action!

If you have this book and you are searching for this particular recipe, you maynot find it because I combined 2 recipes together to give some crunch to the otherwise plain brownie (which is by the way ,absolutely delicious!).


COCOA BROWNIES WITH CRUNCHY MACAROON TOPPING
Recipe: Chery Gooey Crispy Crunchy Melt-in-your-mouth Cookies by Alice Medrich


Macaroon Topping:
Page no:176
Ingredients:
1 large egg white
Scant 1 1/4 cups dessicated coconut (The original called for unsweetened dried flaked, since I didn't have any, I went ahead with this)
1/4 c sugar
3/4 tsp vanilla extract
Large pinch of salt

Cocoa Brownies:
Page222
Ingredients:
11 tbsp unsalted butter
1 1/4 c sugar
1 scant cup cocoa powder
1/4 tsp salt
1 tsp vanilla extract
2 large eggs
1/3 c plus 1 tbsp all purpose flour,preferably unbleached.


Method:
For the topping:
Combine all the ingredients together in a stainless steel bowl and double boil it by setting it over a large pan filled with barley simmering water.
Stir the mixture, scraping the bottom to prevent burning until the mixture is very hot to touch and the egg whites have thickened slightly and turned from translucent to opaque,3-5 minutes. (For me, none of these worked!So I went ahead stirring it for almost 10 minutes.)
Set the batter aside for 30 mins to let the coconut absorb the moisture while you make the brownie batter.

For the brownie:
Pre-heat the oven to 325F.Position the rack in the lower third of the oven.
Line your tin with aluminium foil.

Melt butter in a bowl set directly in a pan of simmering water. Add the sugar, cocoa and salt.Stir until the ingredients are blended and the mixture is hot.
Remove the bowl and let the mixture cool till it is warm to touch.Mix in the vanilla.
Add the eggs, one at a atime, mixing vigorously with a spatula after each addition.
When the mixture looks thick,shiny and well blended, add all of the flour at once and stir until you cannot see it any longer.
Then mix vigorously for 40 strokes with a wooden spoon or rubber spatula .
Spread evenly in a pan.
Top with the coconut topping and bake for 20-25 mins (mine took 32 mins) or till a toothpick inserted into the center comes out dirty looking.
Let it cool.Peel away the foil and cut them into squares. Enjoy!


Verdict:
Jobin is a big fan of macaroons. So he had a double treat! Trust me, you will never miss the chocolate here. It is so fudgy and nice that it is hard to believe that we can get the same texture as that of chocolate browines with the cocoa powder.

So now don't give me an excuse saying,'I didn't have chocolate, so I couldn't make brownies!' :-) Go ahead and try them just as is or with the topping.You are going to love it!
Related Posts Plugin for WordPress, Blogger...