Ria's Collection: Snacks
Showing posts with label Snacks. Show all posts

Monday, May 23, 2011

COCONUT OATMEAL SNACK BARS

Coconut Oatmeal Bars
Idon't think I have told you that I love Coconut Oil or have I? It shouldn't come as a surprise since I come from the Land of Coconuts, Kerala.Given a chance I would cook everything in it,I mean, Kerala stuff. So when I was packing to move to the US one of the two things I held precious were my cookbooks and then 2 packets of Coconut Oil. Unfortunately, in the last minute hurry, I forgot to take the 2 precious packets and I realised that only after I landed here :-( You can guess it, I was definately not happy! So when Amma got a chance, she sent 2 packets with Jobin's bro when he got back after his visit to India.
Coconut Oatmeal Bars

That second packet out the 2 packets is almost over now and that's when Jen from Kelapo wrote to me asking if I wanted to review their product,Kelapo 100% Pure Virgin Coconut Oil. I jumped up with joy and grabbed the offer and she put it in the mail for me that day itself. As soon as I received the packet, I tore it open , unscrewed the bottle's cap and sniffed into it. It smelt so good but much more coconut-y almost like coconut cream. Maybe it's the difference in the processing that it smells different from the regular Indian Coconut Oil.
Coconut Oatmeal Bars

I have read a lot about using Coconut Oil in baking and since I love coconut oil and baking, I decided to combine the two and see how it works in Megan's recipe. The results were good and we loved it. I shared most of it with a friend of ours and she liked it too.
Coconut Oatmeal Bars

The folks at Kelapo has offered you readers a 20% discount if you want to try some of that wonderful oil,so at the checkout use the code Ria20 (It's case sensitive!) to get some bucks off!


Coconut Oatmeal Bars
Aaaannnd my little brother passed his board exams in super flying colours!! So watch out for the next post...there will be some cake in it :)

Coconut Oil
COCONUT OATMEAL SNACK BARS
Makes 12 bars
Ingredients:
1/4 c coconut oil (You can use regular vegetable/canola oil)
1/2 c packed brown sugar
1/4 c granulated sugar
1 egg
1 tbsp skim milk
1 tsp vanilla
1/4 tsp salt
1 1/2 cup oats ( I used Quaker)
1/2 c + 2/3 c  wholewheat flour
1/2 tsp baking soda
1/4 c dessicated coconut

3/4 c chocolate chips, melted
Method:
Pre-heat oven to 350F/180F

Beat together oil, sugars,milk,egg & vanilla for 2 mins or till the sugar dissolves.
Dump the dry ingredients into the wet and mix together until just combined with a rubber spatula.
Spread this in a lightly greased 8 x 8 in. square baking tin and bake for 20-25 mins or until golden( It will be soft to touch).
Take it out and spread the melted chocolate over it. Cool completely and cut into bars.
Store in an airtight tin.

Verdict: Delicious to the last bite! The coconut oil can be substituted for your vegetable/canola oil and still get perfect results! I know I am going to try many other recipes with Coconut Oil. Like I mentioned in my previous post, I really am falling for wholewheat in baking!

Monday, February 21, 2011

DILKHUSH...an Indian favourite my way!

Dilkush

In one of our telephone conversations Amma & I happened to speak about 'Dilkush'. We both had it in our respective hostels during our college days. It was served as a tea- time snack. When I mentioned it to Jobin that evening, even he remembered eating it. Actually we 3 had very fond memories of it so I thought of giving it a try. I knew it was not a puff pastry casing instead something in between rough puff pastry and shortcrust pastry and I had no idea as to how to make it. So I thought of using the rough puff pastry I made a few days ago.
Dilkush

I love the filling. You can really have it alone if you are craving for something sweet.I couldn't stop myself from digging into it while I rolled out the pastry shell. I don't know how far I was successful in it because I think this is the closest I can get to in replicating that sweet at home unless that Bakery guy shares his recipe with me.
Dilkush

Today (Feb 22) is Amma's birthday and I thought I'd post this for her. Last year, we were there in Kannur on that day to celebrate her birthday with her. This year we are continents apart from each other!
IMG_0928


DILKHUSH  my way!
Recipe for the rough puff pastry- My grandmother's cookbook
Recipe for the filling- My own


Ingredients:
For the rough puff pastry:
150g butter
200g plain all purpose flour
a pinch of salt
1 tsp lemon juice
125 ml ice cold water

For the filling:
1 c freshly grated coconut
3-4 tbsp granulated sugar
1/4 tsp cardamom powder, optional

1 egg, lightly beaten for glace
Dilkush

Method:
For the rough puff pastry:
Cut the firm but not hard butter into walnut sized pieces.
Sift the flour and salt together into a wide bowl and add the butter with lemon juice & water.Mix the ingredients lightly with a round bladed knife and maybe use your fingertips too, to form a soft elastic dough.
Turn out the dough to a floured surface & knead it lightly.Shape it into a rectangle and then roll it out into a strip about 3/4 " thick, 12" long and 4"wide keeping the edges straight. Butter will be clearly seen as yellow streaks in the pastry.
Fold the bottom third of the pastry up& upper third down.( It will look like a parcel)
Turn the pastry so that the fold points toward the left hand side, seal the edges lightly with the edge of the little finger.
Roll out the pastry again keeping it 1/2" thick and to a rectangle of 18" x6".Fold it once again.
Place in a plastic bag and leave it in a cool place for 20 mins. Repeat this 4 times more .
Rest the finished pastry for 10 mins before shaping .

For the filling:
Dump all the ingredients together in a pan. Cook on medium heat till the sugar dissolves and it becomes slightly sticky (about a minute or two).
Let it cool completely before you fill the pastry case.

Dilkush

Assembling:
Pre-heat the oven to 425F and position the rack in the centre.
Line a rectangular baking tray with parchment/butter paper.
Divide the dough into 2 parts and roll out each part on a lightly floured surface or using a parchment paper.
Take one rolled out circle and place on the baking sheet.
Top it with the filling. Place the other rolled out pastry sheet over it and seal the edges using water.Fold it over to create a decorative edge.
Brush the top with the egg and cut a small X in the centre of the pastry (just a steam vent).
Bake for 25-30 mins or till it is golden in colour.
Cool completely on a wire rack before serving.


Verdict: I wouldn't say this was the exact same replica, it was definately different. This was more crunchier than the original. Jobin had a totally different filling idea and I didn't know that until he ate a slice. 'Oh this was not the filling that I had in mind but whatever this filling is, it's really good' was his reply after he had a bite!

Thursday, July 22, 2010

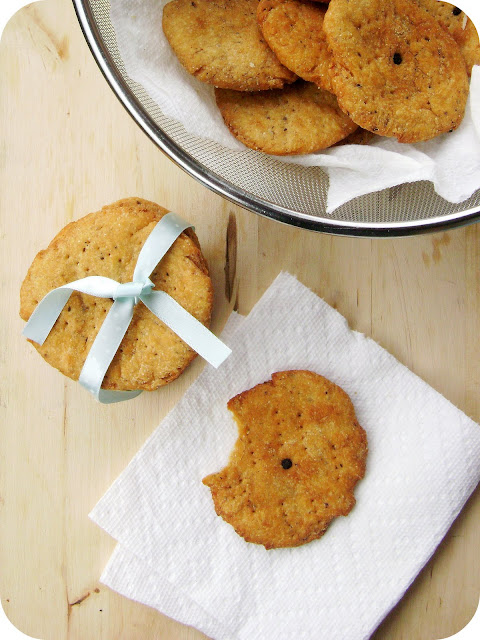
PASTRY CRACKERS WITH BLACK PEPPER AND CAROM SEEDS


I have discussed it before, my love for Matri. I somehow cannot stop raving about this snack whenever I eat them. These days I have been eating the store bought one and somehow I forgot how the homemade ones tastes like. Nah! I was just kidding, how can I forget homemade taste like that! ;-) That was just another excuse for me to make them at  home ;-D

I am like a peacock. I get so happy and excited when I see the skies darken because of rain clouds. It reminds me of monsoons back in Kannur. I used to hate monsoons then because we used to get drenched completely when we went to school. But that was the only time we were allowed to wear sandals to school though.So, no complaints ;-)

So today, as I write this post...it's very dark outside and I am listening to Mozart. I love piano. I  have been planning to take piano classes since forever! It's never happened though.Today while we were having lunch, I was asking Jobin about the pottery classes that we might be having here. I love doing creative stuff, especially hand embroidery. That reminds me of the piece I started to stitch for our kitchen. I went wrong somewhere in between and I am in no mood to trace the mistake and get back . Been keeping away that work for more than a week now.


So while I get back to my work of searching for pottery classes, finishing or rather re-starting my embroidery work, at the same time getting excited because it's Friday tomorrow and lots of planning needs to be done as our friends will be coming over to our place for a game of Sequence and UNO and also plan out the dinner and getting back to the book I was reading...let me leave you all with the recipe for one of my favourite favourite all time snack...Matri.

PASTRY CRACKERS WITH BLACK PEPPER AND CAROM SEEDS
Recipe source : 1000 Indian recipes by Neelam Batra

Ingredients:
All purpose flour/Maida- 2 cups
Semolina/Rava-1/4 cup (not roasted)
Oil-1/4 cup (not coconut/peanut/olive)
Melted Ghee/Clarified butter-2 tbsp
Carom seeds/Ajwain- 1 tsp, coarsely ground
Pepper-1/2 to 1 tsp coarsely ground
Peppercorns-16 nos.
Salt- 1tsp or to taste
Warm water-1/2 cup
Oil for deep frying


Method:

  • Place flour,semolina,oil, ghee, ajwain ,pepper, salt in a bowl and mix well with fingers.
  • Add in the warm water little by little and mix well to for a semi-firm dough.
  • Divide the dough into 16 portions and roll it out into 3-4" circles of 1/8" thickness.If the dough is sticky, use oil and not flour to help in rolling them.
  • Pork holes all over the rolled out matri using the tines of a fork
  • Stick one peppercorn each into the centre of each matri and press firmly.
  • Heat oil on medium hight to 300-325 F and deep fry the matri's until golden brown.
  • Drain on paper towels, let cool completely and store in airtight containers.
  • Will stay fresh for 2 months.


Verdict: I heart it! I can eat it plain or even better, dipped in some spicy Stuffed Green Chilli Pickle.
 I think it was the first time that Jobin ever had one and I must say he mentioned about 'Matri' to everyone whom he met yesterday evening! :)


Friday, March 5, 2010

CRUNCHY PEANUT HEARTS from my Bon Amigo!


There are these friends, whom you instantly contact for help...be it anything! And Aparna was one among  them.I must also mention that I wouldn't trouble her for anything other than things related to food!We met in Goa in September and she helped me in my search for some fresh cream too :) And Oh yes! how could I forget that...she packed some of her homemade cookies for me! She is a FAB baker and a perfect vegetarian cook! And now, while I am trying to settle in this new country, she is helping me 'feed my blog' :) Thank you so much A! :)

Over to Aparna...

When Ria requested me for a guest post for her blog how could I refuse? I first met Ria and got to know her in the “virtual fellow food blogger” kind of way and then met her “for real” when she came down for a visit to Goa a few months back.

A few months back she told me she was getting married, and asked if I could do a guest post (and I quote Ria here) “to feed my hungry blog” during the time she would be busy with wedding related stuff. Well, a friend in need is supposed to be a friend indeed!

She got married 2 weeks back and since I couldn’t make it to the wedding, the least I could do was bake her some virtual goodies. Now, I know that some insanely rich and decadent cake or confection would be more fitting as a wedding present.

But if I know anything at all about weddings in India and the days that follow, it is that Ria would be extremely happy to see some very simple uncomplicated food. Perhaps some crunchy cookies to go with her cup of tea?


Its funny how when I started blogging, I had very few cookbooks and used to feel very limited by the lack of variety of recipes to cook/ bake. Now I have many cookbooks, I seem to have so many recipes that I don’t even remember which book contains what anymore!

Late last year, Ria had sent me a bunch of vanilla beans (think she’s a vanilla bean bearer to lots of us foodies!) and also a copy of The Big Book of Beautiful Biscuits (that’s cookies to some of us). True to nature, I flipped through the pages, admired the book, put it on the shelf and then somewhere along the line forgot all about it!

When I suddenly realized that I had promised Ria a post, I remembered her book and it seemed a good idea to bake something from it. I really like Australian Women’s Weekly books because they contain simple recipes with short ingredient lists, and have always worked very well for me.

And my daughter likes cookies, which her friends like even better!


So here are some Crunchy Peanut Hearts, very slightly adapted from the original.

These cookies have quite a few pluses in my opinion. They’re made from an AWW recipe, they don’t need butter or oil, they have fibre (oats), they contain no eggs and are very good, I didn’t need to go shopping for any of the ingredients, and here’s the best part of all. I just dumped everything in my food processor and voila, the dough was ready!


Ingredients:


3/4 cup all purpose flour

1 tsp baking powder

1/4 tsp baking soda

1/2 tsp cinnamon

3/4 cup granulated sugar

1/2 cup rolled oats, coarsely powdered

1/3 cup dessicated coconut

1 tsp finely grated lemon rind

1/2 cup crunchy peanut butter

1 tbsp honey

2 to 3 tbsps water


Method:


Sift the flour, baking soda and cinnamon into a bowl. Add the sugar, rolled oats, dessicated coconut and lemon rind and mix well. (I did all this in my food processor bowl)

Rub the peanut butter into the dry ingredients (I did this on the food processor but using the plastic dough making blade) until the mixture resembles breadcrumbs. Now add the honey and water, a little at a time, stirring till a soft dough forms.

Turn out the dough onto a lightly floured work surface, knead lightly till smooth, wrap in plastic wrap and refrigerate for 30 minutes.

Take the dough from the fridge and divide into two portions. Roll out each portion into 1/4" thickness, dusting lightly with flour if necessary. Cut out cookies with a 2 1/2" fluted cutter or cutter of desired shape.

Place on lightly greased baking trays and bake at 180C for about 10 to 12 minutes, or till golden brown. Allow the biscuits (cookies) to cool on the trays for about 5 minutes and then cool completely on a rack.

This recipe makes about 30 biscuits (cookies) but I got 40 since my biscuit cutter was a bit smaller.


Sunday, January 3, 2010

HONEY ROASTED ALMONDS


I had mentioned these golden beauties in the menu  for my Appa's 50th Birthday Party . These beauties are such simple li'l things which can give life to a party. I have had store-bought versions of it while I was studying in Bangalore and have always wondered how it was made without the nuts going soggy.

Recently, an old family friend of ours sent us a packet of almonds which were bought from Dubai. They were so so crisp and nice. But I am not a complete almond person. I'd prefer cashew nuts or peanuts anyday! Nevertheless, my dad and mom were raving about it's goodness. 


On the eve of my Appa's birthday, they had gone out to run some errands and I was thoroughly bored sitting at home. We didn't have good voltage ,so I couldn't bake anything.That was when I thought of roasting some almonds.


After reading through many many recipes, I zero-ed in on one. It was very simple and quick recipe!

HONEY ROASTED ALMONDS
Recipe source: www.cooks.com 

Ingredients:
Almonds-2c , whole with skin on
Sugar-1/4 c
Salt-1/2 tsp
Honey-2 tbsp
Water-2 tbsp
Oil-2 tsp

Method:

  • Spread the almonds in a single layer in a shallow ungreased baking pan and place in a cold oven. Bake at 350 degrees, stirring occasionally, until the colour of nuts is tan (12 to 15 minutes). Remove from oven and set aside.
  • Thoroughly mix the sugar and salt. Stir together the honey, water and oil in a medium size pan and bring to a boil over medium heat. Stir in the roasted almonds and continue to cook and stir until all the liquid has been absorbed by the nuts (about 5 minutes). Immediately transfer to a medium bowl and sprinkle sugar mixture over all and toss. Spread on wax paper and cool.
  • Variations for the above recipe: You can try spicing it up by adding a pinch of nutmeg/cinnamon/cardomom etc.

I was pleasantly suprised how good almonds could taste this way!! The salt and sugar combination makes it so addictive! My guests were completely hooked onto it...requests for the recipe were flying at me! My Appa's best friend even thought these were imported! Wee! What a compliment! :) This has become a firm favourite in my house. Amma just cannot keep her hands off of it! :D


My sincere request to all almond lovers: Try these at least once in your lifetime, there is no better way of eating them! It is really delicious!

Now I am thinking of trying some with peanuts/ground nuts. Might have to vary the cooking time depending on the type of nuts used...so will keep you all updated about how it goes! :D


Tuesday, November 3, 2009

CHOCOLATE YOGHURT CAKE ~ for lil Appu ~

'Put "eat chocolate" at the top of your list of things to do today.That way, at least you will get one thing done. "
Author unknown


\Appu, 3 yrs old is my nephew. Yes, I am a lucky aunt to be blessed with 6 niece's and 15 nephews( and the list will have 2 more very soon! )! And each one of them have their own likes and dislikes . My mom, is very observant when it comes to each one's likes and dislikes and she asks me to help her make something accordingly. Last time it was a 1-2-3-4 Nutmeg Cake with Mocha Ganache for Navya, Neev and lil angel Nial.

Appu L.O.V.E.S our good ole chocolate cake. So the moment Amma knew that he would be coming over, she asked me to bake a chocolate cake for him. But somehow I couldn't make it ahead of their coming, instead made it with him. Sorry, I don't have any pics of the making...since managing a child + whipping up a cake batter + clicking pics would drive me insane!But I must mention that he is one the calmest , mature 3 yr old that I have ever seen!

A lil more about him... He is Neil and we fondly call him as Appu . He lives in Dar e Salam, Tanzania. He is in India with his Mama, who actually came down for her delivery ( which can happen in 2 weeks from now!). He adores & dreams all day n night about Spiderman! He even sings the title song of Spiderman movies for you!

Since Spiderman is his hero, he is always on the lookout for spiders . If you are not watching him, he is bound to catch hold of one and make it bite him so that he can become another Spiderman and make webs by pressing a button on his wrist... look at what the media can do to a 3 yr old! :)

Now, let's get back to the cake :) I made a bunny shaped cake for him.


CHOCOLATE YOGHURT CAKE
Recipe source: Valsamma aunty

Ingredients:

Flour-2 3/4 c
Sugar-2 1/2 cup
Butter-3/4 c
Yoghurt-1 1/2 c
Cocoa-3/4 c
Eggs-3
Baking powder-1 tsp
Baking soda-2 1/4 tsp
Boiling water-1/2 c
Salt-1/4 tsp
Vanilla essence- 1/2 tsp

Frosting:


Method:
  • Sift flour with baking powder and baking soda.
  • Make a paste using cocoa powder and boiling water.
  • Cream butter with eggs, sugar and salt. Beat till the sugar dissolves.
  • Add flour, yoghurt and cocoa powder in one go and beat well.
  • Pour into a prepared tin and bake for 45-50 mins or till done.
  • Cool in tin for 10 mins and transfer onto a wire rack and let it cool completely.
  • Frost as desired.


It was truly a soft, moist cake. He ate a few pieces with us and packed some to take back home with him :) Okay, now I am waiting for the next niece/nephew to come home! :)

Wednesday, October 21, 2009

MINI CHICKEN & BELL PEPPER SPRING ROLLS

I just can't believe that it's been a week since I updated my blog! Whoa! See this is what happens when the 'Manavatti' ( gonna-be-bride) goes shopping! :D
It was actually shopping + a small vacation in Trivandrum. But lil did I know that I would come back with a terrible back pain. Went to the doc today and he said it was just a muscular pain...what ever ! All I know is I can't even brush my teeth! ACK!
This is one of my mom's signature snack and we always have atleast one packet ready in our freezer :) It is a super good make-ahead snack, all you need to do is thaw and fry them .I had tried making it 2 years ago for the first time, but it turned out to be something else ( shapewise ) BUT trust me the filling was delicious :)
MINI CHICKEN & BELL PEPPER SPRING ROLLS
Recipe source: My mom

Ingredients:

For the wrapper:
Flour:500g
Oil-1/2 cup
Salt-to taste
Water- as required

For the filling:
Chicken-250 g,boiled & shredded
Cabbage-250 g
Carrot-250g
Beans-250 g
Onion-250g
Bell pepper-1 ,small
Ginger garlic paste-3 tbsp
Soya sauce-1 tbsp
Green chilli- 3-4
Aji-no-moto - a pinch, optional
Salt-to taste
Black pepper powder-to taste
Oil-5 tbsp

Oil for deep frying
Method:

For the wrapper:
  • Mix everthing together and form a soft dough. Leave it aside for 10 mins.
  • Divide them into lime sized balls and roll out into thin flat discs.
  • Heat a flat pan, and cook them only on one side. Make sure you don't end up with dark brown spots on them because they will be too dry to roll up.
  • Continue with the other wrappers in the same manner.

For the filling:
  • Heat oil, and saute ginger garlic paste.
  • Add the vegetables and mix well. Cover and cook them till they turn soft making sure you give them a good stir often.
  • Add the soya sauce & salt.
  • If you want it to be more spicy, add some black pepper powder.
  • Use this to fill the wrappers.

Assembly:
  • Put the filling on the uncooked side of the wrapper
  • Check this video to see the rolling up of the wrapper with the filling inside .
  • Deep fry and serve hot with a sauce of your choice.
I always try to stay away from these because I know I can never stop with 1 ! It remains crisp for few hours provided you don't leave them under a fan! :)

You can make these as tiny as our lil finger or slightly bigger. If it's the latter, you can cut them diagonally and serve!


Related Posts Plugin for WordPress, Blogger...