Ria's Collection: Breads
Showing posts with label Breads. Show all posts

Wednesday, August 24, 2016

PIZZA HUT STYLE BREADSTICKS RECIPE & A GIVEAWAY!

How to make breadsticks better than Pizza Hut with flavours fresh from Italy!
Pizza Hut Style Breadsticks
These breadsticks are really to die for! They are so chewy, so addictive, so flavourful, so filled with everything you asked for and so full of carbs! Don't get me wrong when I said it is filled with carbs. I am all for it and on most days I am on a carb heavy diet. I mean, how can I ever say no to rice and bread. They are the staple food in our home. Ian asks for bread everyday and will be happy if I gave him that for all three meals!

Pizza Hut Style Breadsticks
He is all for Pizza, like most kids are. Once a week, I bake him a pizza at home with his choice of toppings,which almost always ends up being Pepperoni! No surprises there! So yesterday, when I made these bread sticks, I told him it's like a deconstructed pizza and that he needed to dip the bread sticks in the delicious Whole Garlic & Sweet Basil Marinara from Mezzetta. He wasn't very excited about that idea at first but once he took a bite of it, he was really hooked onto it. He literally licked the plate clean! Thank you Michelle for this delicious recipe!
Pizza Hut Style Breadsticks
Mezzetta makes really good marinara sauces in multiple flavours. We are big fans of anything with garlic in it,so we picked up the Whole Garlic & Sweet Basil Marinara sauce to dip these wonderful bread sticks in. It's 100 % natural marinara sauce made with San Marzano tomatoes with no added colours or sugar. I am already eyeing their other flavours like Caramelized Onion & Butter Marinara!
PIZZA HUT STYLE BREADSTICKS
Pizza Hut Style Breadsticks Makes 20 pieces

Ingredients:
For the breadsticks
1/4 cup non fat dry milk
1 tablespoon sugar
2 1/4 teaspoons rapid rise yeast
1/2 teaspoon salt
1 1/3 cup warm water
2 tablespoons olive oil
4 cups bread flour

For the seasoning:
2 tablespoons grated Parmesan cheese
1 tablespoon onion powder
1 tablespoon dried oregano
1 3/4 teaspoon garlic powder
1 1/2 teaspoon dried basil
1/2 teaspoon salt

12 tablespoons butter, melted

Method:
Breadsticks: Place the dry milk powder, sugar, salt and yeast in the bowl of your standmixer attached with a dough hook.Add the warm water and mix well. Let it sit aside for 10 minutes until foamy. Add the oil and mix well. Add the flour 1 cup at a time,kneading on low speed. Once all of the flour is added, increase the speed to a medium high and knead for 5 minutes.

Meanwhile, take two 9X13 inch pans and pour 4 tablespoons of melted butter into each of them. Divide the kneaded dough into two equal parts and roll them out into two 9X13 inch rectangles and place them in the tins. Cover and let it proof until doubled in size, approximately 90 minutes.

Seasoning: Mix all the ingredients together in a small bowl and set aside until needed.

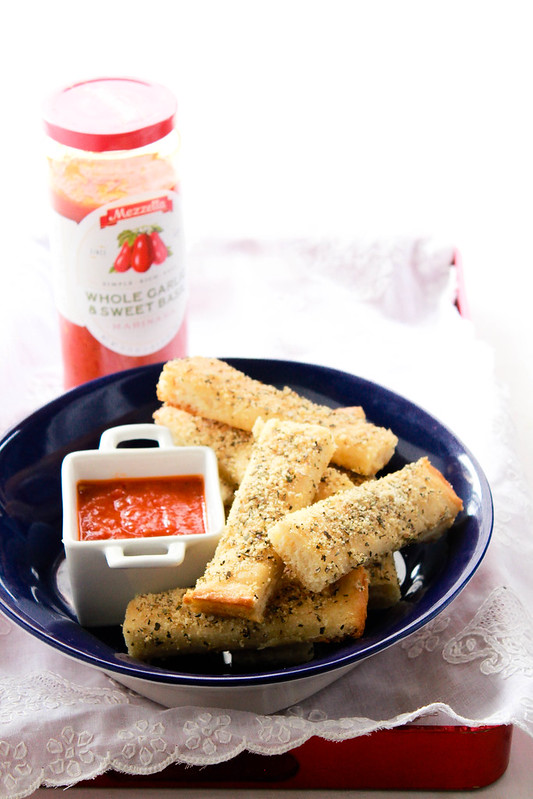
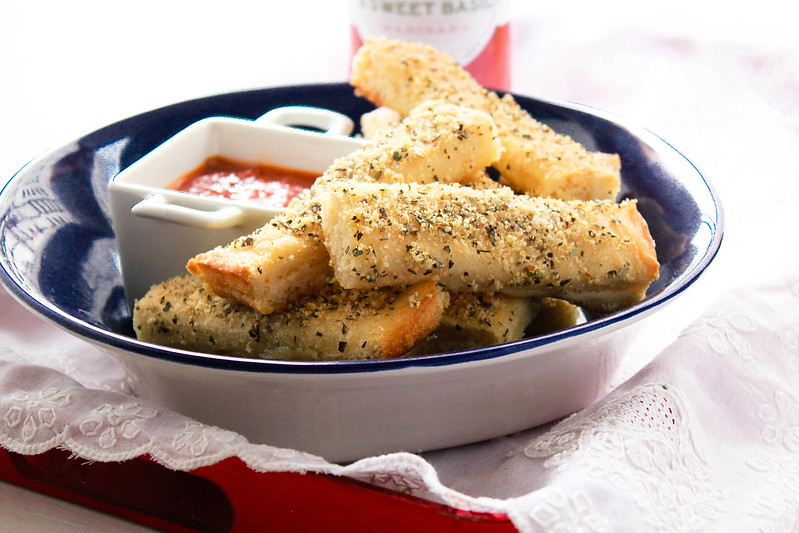
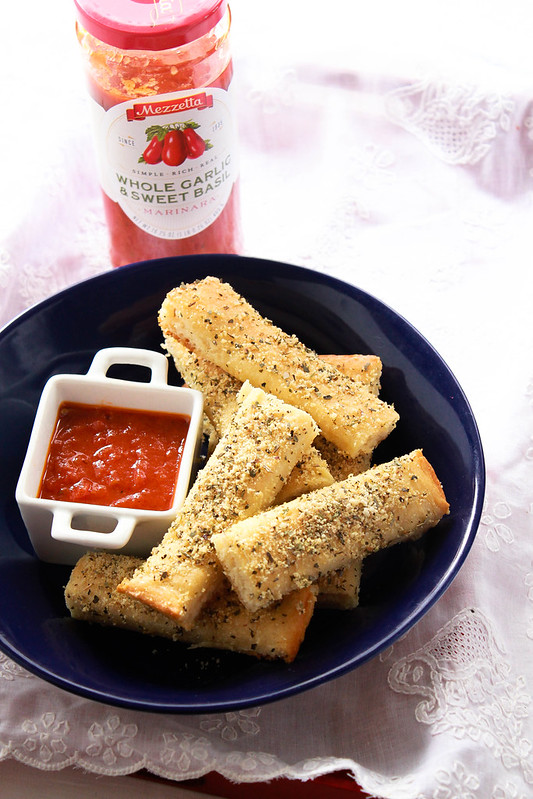
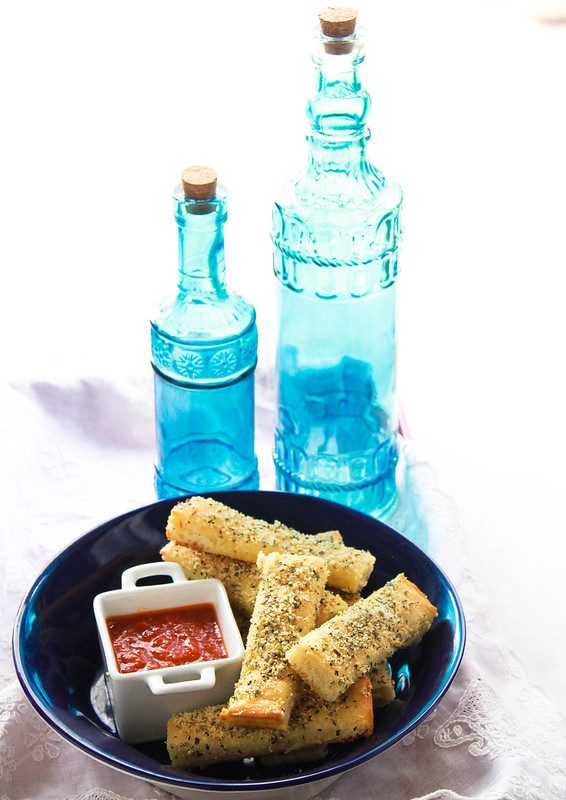
Preheat the oven to 475 F.Once the dough has risen, score each pan of dough into 10 breadsticks. Brush the tops with 1 tablespoon each of melted butter and bake for 12-15 minutes or until the are brown at the edges. Take them out and sprinkle generously with the seasoning. Let it cool in the pan for 15 minutes, then slide it out onto a cutting board. Slice the breadsticks with a pizza cutter or knife and serve them warm with your favourite marinara sauce.

These were really good! The seasoning is spot on and will make you crave for more! Try it sometime and be surprised as to how easy it is to recreate restaurant food at home!

Mezzetta is holding a HUGE giveaway for you! The Grand Prize consists of a trip for a Winner and one (1) Guest to attend culinary experiences (including cooking class and farm tour) in the San Marzano region of Italy and explore other cities of Italy. The Grand Prize trip consists of the round trip coach air transportation between the major commercial airport nearest to winner's residence and Rome, Italy and the culinary experience and tour of Italy.

To enter,click here!

I am also very excited about our upcoming trip to the Valleyfair for the Green Giant Corn Feast!

Tuesday, May 18, 2010

BREAD BAKING CLASS WITH ZOE & JEFF #22

I always wanted to attend a cookery class, just to get the feel of it. Amma has been conducting cookery classes herself and I was her sous-chef. But I never got enrolled into one until last saturday.

Jeff and Zoe are from Minneapolis and they conduct bread baking classes from their books in a school here. I applied and to my dismay I was put on a waiting list but in the end...I got through.
I was so excited that morning because I love meeting fellow food bloggers. And when I reached there, I met Zoe and she instantly recognised me (to my suprise!) . Yes, we are friends on Facebook and Twitter,but still, you wouldn't expect a person like her to remember all the faces!

I had a fabulous time learning how to make healthy bread in five minutes a day!They knew what they were doing which definately made learning from them very easy!

We were served the breads in between with cheese and jam. And I must say, all of them tasted very good! I loved the Cinnamon Cresents with Cream Cheese Topping and the Danish Braid with Berry Filling.
I am waiting for their next class now. Before that, I better stock up my pantry with all what I need to bake bread from next week on. Till then, we shall manage with the storebought one :)

Sunday, August 2, 2009

♥Cheese & Chilli Chicken Pizza ♥ O-So-Moreish! ♥


Yesterday while I was pottering around in our kitchen wondering what I should cook today... I saw a bottle of pizza sauce in the cupboard. I got it from Ooty few months ago.
We all LOVE pizza! And it was something I have never made from scratch...especially the base. So after a small brainstorming session with Amma we decided upon making a pizza :) And the happiest person to hear the decision was my brother! :D He just can't resist a good pizza...

I had bookmarked a pizza base recipe from Smitten Kitchen long back and never got to try it till date...so thought of trying it out today! :)


♥ Cheese & Chill Chicken Pizza♥

Things you'll need:

Pizza base- 1 no. ( recipe follows)
Pizza sauce- homemade/store bought
Cheese-100 g ( I used Cheeza from Britannia)
Chilli chicken-1 portion (recipe follows)
Chilli flakes-2-3 tbsp

Pizza base
Recipe adapted verbatim from Smitten Kitchen

Makes enough for one small, thin crust pizza. Double it if you like your pizza thick and bready.

Ingredients

1 1/2 cups flour (can replace up to half of this with whole wheat flour)
1 teaspoon salt
3/4 teaspoon active dry yeast
1/2 cup lukewarm water (may need up to 1 or 2 tablespoons more)
1 tablespoon olive oil

  • Stir dry ingredients, including yeast, in a large bowl. Add water and olive oil, stirring mixture into as close to a ball as you can. Dump all clumps and floury bits onto a lightly floured surface and knead everything into a homogeneous ball.
  • If you are finding this step difficult, one of the best tricks I picked up from my bread-making class is to simply pause. Leave the dough in a lightly-floured spot, put the empty bowl upside-down on top of it and come back in 2 to 5 minutes, at which point you will find the dough a lot more lovable.
  • Knead it for just a minute or two. Lightly oil the bowl where you had mixed it — one-bowl recipe! — dump the dough in, turn it over so all sides are coated, cover it in plastic wrap and leave it undisturbed for an hour or two, until it has doubled in size.
  • Dump it back on the floured counter and gently press the air out of the dough with the palm of your hands. Fold the piece into an approximate ball shape, and let it sit under that plastic wrap for 20 more minutes.
  • Sprinkle a pizza stone or baking sheet with cornmeal and preheat your oven to its top temperature. Roll out the pizza, toss on whatever topping and seasonings you like.
  • Bake it for about 10 minutes until it’s lightly blistered and impossible to resist.

Chilli chicken
Recipe adapted from Nita Mehta

Ingredients:
Boneless chicken/Chicken breast -100 g cut into 1/2" pieces
Red chilli paste or red chilli powder- 1/4 tsp
Soya sauce- 1 tsp
Salt & pepper to taste
Cornflour-2 tsp
Oil for frying

Method
  • Marninate the chicken pieces with everything except cornflour and leave aside for 30 mins.
  • Drain the excess marinade , add cornflour and mix well.
  • Fry the pieces in oil.
  • Mix with 1 tbsp of the sauce to keep the chicken succulent.

Assembly:
  • Roll out the base.
  • Smear the sauce, grate some cheese over it.
  • Sprinkle some chilli flakes over it.
  • Arrange the chicken pieces.
  • Grate some cheese over it again.
  • BAKE!!! :)
The pizza was over in 3 mins FLAT!! Need I say anymore?? :D We actually had a fight (me n my bro) for more wedges :P I was trying to save atleast one for my dad and he was eyeing that as well! All this happend in less than 3 mins and by the end of it...I was tired BUT very happy! :D

The base was super good and the chicken pieces remained soft & juicy! Even before my bro had his 2nd bite... this was the conversation:

Bro:Is it difficult to make?
Me:No(I knew what was coming! :D)
Bro: ( a very very broad grin)
Me: (was very happy cos that meant 'Please make it often')

Off it goes to YEASTSPOTTING !


Sunday, May 17, 2009

Bread Making + an Award = Pure Bliss


Bread Making was not something I was ever interested in... I found it very boring for some unknown reason ...maybe beacuse I love colours and breads are usually pale/white. And I always felt " Is it something worth the effort when you just have to pay Rs.15 for loaf! " LOL! That was the lazy Ria! "D


But recently I'm completely smitten by Deb's Smitten Kitchen :) While browsing through her recipe index, I came across the bread section and there was this 'BEST CHALLAH' recipe which seemed to have a very straightforward method and simple ingredients and lovely braiding instructions... Now I know why I am in the Textile Industry ... for the love of colours and the interest in interlacing of yarns! :) All through the braiding process I really felt like I was weaving out something... because the instructions said.. 2 up 1 down sorta thing which is so like the weaving procedure on a loom :D Am I boring you all?? ;)

So let's get back and take a look at my steps for bread /Challah making :D


The dough all set to rise
The wonderful , absoultely elating braid. My dad was at home yesterday because of a public strike so I asked him to read out the braiding instructions :) and he being a perfectionist we almost ended up fighting.. he was like.. that's not of the same size as this... its thin in the middle thick at the ends.. what's this.. blah blah! LOL! I was answering back for everything... actually back answering :D Then my mom also joined us! Poor thing... it took some time for her to actually understand the braiding steps... :)

O! how I love her!

We made one big braid as you saw on top and several small ones with the other half of the dough...there was plenty of dough... Amma & me had an amazing time brading them... on the whole it was a family bread making day!!
Ahh! you must make one for sure to know how it feels when the braiding is done and when you see the dough rising! It's sooo rewarding! :)
Out of the oven! Pure bliss!!
Enjoying on the lawns :D

Look at my beauty! Am I being too hyper?? Maybe! :D


Best Challah (Egg Bread) : Verbatim from Smitten Kitchen


Adapted from Joan Nathan and adapted again from Smitten Kitchen :)


The secrets to good challah are simple: Use two coats of egg wash to get that laquer-like crust and don’t overbake it. Joan Nathan, who this recipe is adapted from, adds that three risings always makes for the tastiest loaves, even better if one of them is slowed down in the fridge.
Time: about 1 hour, plus 2 1/2 hours’ risingYield: 2 loaves

  • 1 1/2 packages active dry yeast (1 1/2 tablespoons)

  • 1 tablespoon plus 1/2 cup sugar

  • 1/2 cup olive or vegetable oil, plus more for greasing the bowl

  • 5 large eggs1 tablespoon salt

  • 8 to 8 1/2 cups all-purpose flour

  • 1/2 cup raisins per challah, if using, plumped in hot water and drained

  • Poppy or sesame seeds for sprinkling.
Method:

1. In a large bowl, dissolve yeast and 1 tablespoon sugar in 1 3/4 cups lukewarm water.

2. Whisk oil into yeast, then beat in 4 eggs, one at a time, with remaining sugar and salt. Gradually add flour. When dough holds together, it is ready for kneading. (You can also use a mixer with a dough hook for both mixing and kneading, but be careful if using a standard size KitchenAid–it’s a bit much for it, though it can be done.)

3. Turn dough onto a floured surface and knead until smooth. Clean out bowl and grease it, then return dough to bowl. Cover with plastic wrap, and let rise in a warm place for 1 hour, until almost doubled in size. Dough may also rise in an oven that has been warmed to 150 degrees then turned off. Punch down dough, cover and let rise again in a warm place for another half-hour.

4. At this point, you can knead the raisins into the challah, if you’re using them, before forming the loaves. To make a 6-braid challah, either straight or circular, take half the dough and form it into 6 balls. With your hands, roll each ball into a strand about 12 inches long and 1 1/2 inches wide. Place the 6 in a row, parallel to one another. Pinch the tops of the strands together. Move the outside right strand over 2 strands. Then take the second strand from the left and move it to the far right. Take the outside left strand and move it over 2. Move second strand from the right over to the far left. Start over with the outside right strand. Continue this until all strands are braided. For a straight loaf, tuck ends underneath. For a circular loaf, twist into a circle, pinching ends together. Make a second loaf the same way. Place braided loaves on a greased cookie sheet with at least 2 inches in between.

5. Beat remaining egg and brush it on loaves. Either freeze breads or let rise another hour.

6. If baking immediately, preheat oven to 375 degrees and brush loaves again. Sprinkle bread with seeds, if using. If freezing, remove from freezer 5 hours before baking.

7. Bake in middle of oven for 30 to 40 minutes, or until golden. (If you have an instant read thermometer, you can take it out when it hits an internal temperature of 190 degrees.) Cool loaves on a rack.


Note: Any of the three risings can be done in the fridge for a few hours, for more deeply-developed flavor. When you’re ready to work with it again, bring it back to room temperature before moving onto the next step.


Verdict: Mine can definately beat the store bought ones! That's what our family tester (My bro) said! :) What more do I need? :D This is my first attempt & the best thing is I don't find bread making boring!! Instead...I'm thinking of serious business!! :D Need to explore the bread world in detail :)


And to add more to the excitement I have been awarded by my very good blogger friend Smita of Saffron Apron! Thank you soooo much Smits!! :D


There are some rules to the award:
1) Add the logo of the award to your blog.
2) Add a link to the person who awarded it to you.
3) Nominate at least 7 other blogs (Only if you like).
4) Add links to those blogs on your blog.
5) Leave a message for your nominees on their blog

Here goes my nomination! :)
Aran
Meeta
Helen
Deeba
Rachel
Aparna
Maria

Thank you so much for being an inspiration for me :) Love your work and your passion towards it! :)This Challah is my entry to Bookmarked recipes
You can spot it at Yeastspotting too!

Have a nice week everyone! :)

-Ria


Saturday, February 7, 2009

PITA BREAD


My darling brother Ritchie is an absolute foodie! He is in love with Shawarma! Shawarma and my bro are a great hit together ;) .. yes this is another food & person related post!! :)
I must admit that even I really like it! Well, this post is not about Shawarma , but the bread which encloses the wonderful filling for it! I was browsing through one of my favourite blog and I came across this recipe posted on her website.

This is my first attempt at an Arabian cuisine! Must say it was a good try! I really like the taste of it! This recipe is fuss - free... how can I go wrong when Shn has explained everything so well!!
I know that this post has been a short one but it was very fulfilling all because I really was satisfied with the outcome.. :)
You can find the absolute fuss free recipe here :

So try a hand at making Khoubis and let me know!!
Take Care and come back for more !
Related Posts Plugin for WordPress, Blogger...