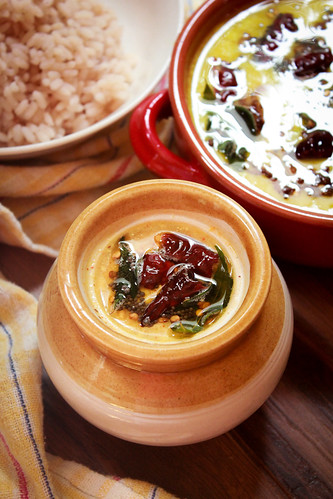
Ria's Collection: April 2019

Friday, April 12, 2019

THAKKALI PACCHADI

Thakkali Pacchadi
Iam a huge fan of Pacchadi. The only Pacchadi that I grew up eating was the one made with Vellarikka which Jaanu Chechy made for us occasionally. It is also known as 'Banni' in Kannur. Jaanu Chechy is an expert at making Vellarikka Pacchadi & Kannur style Meen Curry that whenever we get a chance, we ask her to make it for us. Even now, whenever I go home the request never stop! If she is coming home to help, chances are that there will either be her Meen Curry or Pacchadi on the table by lunch time!

Thakkali Pacchadi
Later when I was in college, Mini aunty would make her special Paccha Manga Pacchadi for lunch which was extremely delicious! I would literally eat just that and maybe a spoonful of rice. It's made very differently from the way Jaanu Chechy made hers. It did not have the ground coconut & mustard paste in it.  So I used to be confused as to why it was called a Pacchadi!

Thakkali Pacchadi
When I moved to Minnesota, I've seen many call the usual salad that we serve for Biriyani, the raw onion-tomato-green chilli- yogurt kind of salad as Pacchadi. So basically a Pacchadi can mean different things to different people depending on where you were raised! :-) I got this recipe from 'Ente Tharavaadu Pachakam', a cookbook Amma gifted me close to a decade ago. It's the second most used cookbook in my collection, the first being Amma's handwritten family favourite recipe book for me.
THAKKALI PACCHADI
Thakkali Pacchadi Serves 4-5

Ingredients:
1 large tomato, diced
1/2 - 1 teaspoon red chili powder
1/4 teaspoon turmeric powder
A sprig of curry leaf
Salt
1 cup water

Grind together:
1/2 cup grated coconut
1/2 teaspoon black mustard seeds
1/4 teaspoon cumin seeds

1/2 cup thick plain yogurt

Tempering:
1 tablespoon coconut oil
1/2 teaspoon black mustard seeds
1 sprig curry leaves
2 dried red chilies

Method: Into a saucepan, add the tomatoes, red chili powder, turmeric powder, curry leaves, salt and water. Bring it to a boil and let it cook for 6-8 minutes or until the tomatoes are cooked and very soft. In the meantime, grind together grated coconut, mustard seeds & cumin seeds along with some water to a very fine paste. Add the yogurt and blend it for 30 seconds.
Once the tomatoes are cooked, add the ground coconut - yogurt mix to it and cook stirring continuously over low heat till the mixture begins to steam. Turn off the heat and set aside. Do not let it boil or else the mixture will spilt and it will look ugly.
In a pan, heat the coconut oil and pop the mustard seeds. Add the curry leaves & dried red chilies, give it a quick stir and pour it over the pacchadi. Adjust salt and let it sit, partially covered for 1-2 hours for the flavours to meld.
I made this for us just yesterday and now that Vishu is just around the corner, I thought I'd share this recipe with you all. This is a very easy side dish to make but you need to be careful about not letting the mixture boil. Once it splits, it looks ugly even though it will taste just fine. So just keep stirring it and as soon as the mixture begins to steam, turn off the heat. If you'd like, you can continue to stir it for another minute so that the residual heat doesn't let it split. I do that especially when I make Moru Kachiyathu where it's mostly yogurt.
We love this with Matta rice and a thoran on the side. I prefer to make Pacchadi a few hours before serving time,so that the yogurt gets a chance to turn a little sour. It kind of makes the Pacchadi taste even better, especially when you make it with Vellarikka.

Wednesday, April 10, 2019

CHOCOLATE & ORANGE LEOPARD BREAD

Chocolate & Orange Leopard Bread
This bread has been on my mind for atleast 3 years now. Everytime I've seen it, I wanted to try making it at home. Somehow, it got pushed until yesterday. There are so many different ways that you can make such breads and this is the most easiest pattern. Atleast that's what I think.The delight & excitement that I felt while slicing into it was incomparable! I really felt like a little child then. I must also mention that this recipe is eggless and does not use any food colouring!
Chocolate & Orange Leopard Bread
This bread is sweet,not very sweet but it is sweet if you compare it with storebought bread. I somehow felt that it's a cross between a cake & bread. The entire process of making this bread using this recipe was fun for me. I feel it would make a perfect activity for kids especially on a rainy /snowy day. Talking about snowy day...we are having a snow storm right now. Just when it touched 68F the other day and after 3 weeks of good weather...when the trees and plants have started to sprout! Hmm...that's how our sweet Minnesota is...unpredictable! I still remember the weather on Ian's First birthday party. It's usually pretty hot in July but that day, it went down to 40's! We had the party outdoors in a park and all of us ended up wearing jackets!
Chocolate & Orange Leopard Bread
Getting back to this wonderful bread...try it on a day when you need a 'pick-me-up'. It will definitely make your day! I don't know how it will taste if you omit the orange from this recipe. Initially, I did not want to but after tasting it, I felt that it was a good addition. It could be because I like orange in my baked goodies. I do not enjoy fruit filled chocolates though. I can never get myself to like them.
Chocolate & Orange Leopard Bread
When you read the instructions below, it can look a bit confusing at first. It's one of the simplest things to make in reality. You make one dough, divide it into three. Then you are basically rolling them and wrapping them around each other to form a sausage shape. Then you further roll them into long ropes, cut it, stack it and bake. You don't even need an egg wash for the top! It gets golden as it bakes.
CHOCOLATE & ORANGE LEOPARD BREAD
Chocolate & Orange Leopard Bread Makes one loaf

Ingredients:
1 cup warm milk
2 tablespoons (25 g) cornstarch
1 1/2 tablespoons (15 g) yeast
2/3 cup (70g) sugar, divided
4 tablespoons unsalted butter, melted & cooled
1 teaspoon vanilla
2 tablespoons orange zest
3 cups (375 g) all purpose flour

Dark chocolate paste:
2 tablespoons cocoa
1 tablespoon milk

Light chocolate paste:
2 teaspoons cocoa
1 teaspoon milk

Method: In the bowl of your standmixer using a dough hook, whisk together warm milk, cornstarch, yeast, 2 tablespoons sugar and set it aside for 6-8 minutes till it turns frothy. Add the melted butter,orange zest, vanilla extract and turn on the mixer on low speed. Add the flour by the cup and let it mix on medium high speed until it forms into a dough. Turn off the mixer and let the dough rest for 10 minutes. Then turn the mixer on high speed and knead for 8 minutes. Divide the dough into two equal portions. Let's name it A & B. Divide B two equal portions. Now you are left with three dough balls. A, B & C.

Make the dark & light chocolate paste by mixing together the given amount of cocoa and milk  in a small bowl. Tint dough B with dark paste and dough C with light paste. You may have to knead the dough for 2-3 minutes by hand to get them in a uniform colour. Wrap A, B & C in plastic wrap and chill for 1 hour.
After 1 hour, take out the dough balls and further divide each into 7 equal portions. So now you have 21 dough balls.

Using your hands, roll out the light brown dough into hot dog shapes, about 4 inches long. Set them aside.
Using a rolling pin, roll out the dark brown dough into a flat oval and wrap each of them around the light brown hot dog shapes. Use water to seal the edges.
Using a rolling pin, roll out the white dough into a flat oval and wrap each of them around the dark & light chocolate rolls. Use water to seal the edges.

Now you have 7 tri-coloured rolls. Using your hands, roll each of them into atleast 14-15 inch long ropes and cut them into the two. You will be able to see the beautiful pattern now.
Transfer them into a lined 8 X 5 inch loaf tin by stacking them on top of each other. Cover it with a tea towel and let the dough rise until doubled, till the top of the tin.
Preheat the oven to 375F and then reduce it to 350F as you put the bread in. Bake for 35-40 minutes. Let it cool in the tin for 5 minutes and then unmould the bread and let it cool completely on a wire rack.
Slice and enjoy!

I've tried my best to simplify the instructions. If you have any questions, do let me know in the comment section below.
We really enjoyed the bread. Ian was the only one who didn't like it. I am guessing he didn't like the chocolate-orange combination. Other than that, I must say it was a success! Zara calls it the Tiger Bread! :-) I cannot wait to try other designs now. It's really an exciting process, you should try it to experience it!

Tuesday, April 2, 2019

BREAD VADA

Bread Vada
I
don't know about you but I love Teatime! It's something we always cherished at home and I am trying my best to continue that tradition in our house too. I admit that it's a lot of work because it kind of happens right after you are done with the lunch clean up. It used to be a subtle affair earlier but now as the children are growing up, their appetite seems to be growing at lightening speed! No matter what I cook and how much I cook, everything gets over in no time at all.
Bread Vada
These days, I say a silent prayer while I cook. A one line prayer for the food to stretch for another meal so that I don't have to cook four times a day, everyday! So back to the topic... I cannot do a subtle Teatime anymore. It's full on...Boost, Tea, Coffee and sometimes even a glass of Green Juice for the little lady! Then the food. I honestly thank heavens because I enjoy cooking. If not, I would have walked out of the house already! :-)
Bread Vada
No one asks for it but if I make something around Teatime, it vanishes in two seconds. So I know, everyone is hungry! I try to make different things for 'naalumani' so when I came across this recipe by Lakshmi Nair, I made a mental note to try it sometime. Now that Jobin's mummy is with us, it's even more exciting to plan and execute THE snack for the day.
Bread Vada
While I was frying these vadas, Jobin reached back home from work and I immediately asked him if he could make some tea for us to sip while munching on piping hot vadas. While we were hankering around the stove, I told him about my prayer these days. He laughed and said that there's no way that the food I make can last long! I mean, seriously? But why? :-( He was like please don't even think that you can cook one day per week and stretch that food...because we LOVE to eat! I agree, all 4 of us live to eat.
Bread Vada
I sometimes dream of having a help in the kitchen like how Amma has. Like, there are days when I don't feel like touching another dirty cup! There's no paid help in our house and we do every chore ourselves. Kids have designated jobs to do everyday and they do it, luckily without hesitation.  Now that Spring is here, it's going to get extra crazy with ALL the yard work that's waiting for us outside. We have a huge wooded/ private backyard which is extremely beautiful throughout the year but maintaining it is work. When I am gone to India in Summer, Jobin is left with all the work in and around the house and he tells me that it's exhausting. I agree. But the satisfaction that you get when you do it for yourself is something worth experiencing!
Bread Vada
BREAD VADA
Bread Vada Makes 12-14 pieces

Ingredients:
10 slices white bread, crumbled
1 cup yogurt,whisked
2-3 tablespoons water
1/2 cup rice flour (puttu podi)
4 tablespoons semolina
1 medium onion, diced
2 green chilies, diced
1 inch piece ginger, diced
1/4 teaspoon baking soda
Cilantro, as needed
1 small sprig curry leaves, torn
Salt
Oil for deep frying

Method: In a large bowl, mix together the bread, yogurt and water and set it aside to soak for 5 minutes.In the meantime, heat the oil for deep frying. After 5 minutes,add the remaining ingredients to the soaked bread mixture. It should be like ' Uzhunnu Vada' consistency. Basically, if you scoop some batter in a spoon and tap the spoon, it should fall back into the bowl. If needed,add just enough water to get to that consistency. Wet your palm, pinch a small ball out of the batter, pat into the palm, mark a hole in the centre and gently drop it into the hot oil. Fry till golden on both sides,about 2 mins. Drain excess oil on tissue paper and serve hot!
It's a quick snack that you can make with easily available ingredients. Even though it doesn't taste like 'Uzhunnu Vada' it's a nice crisp snack with a faint sweetness from the bread and heat from the green chilies.You can serve it with Ketchup or any other spicy sauce of your choice. We really enjoyed it and as usual it vanished in under 5 minutes!
Related Posts Plugin for WordPress, Blogger...