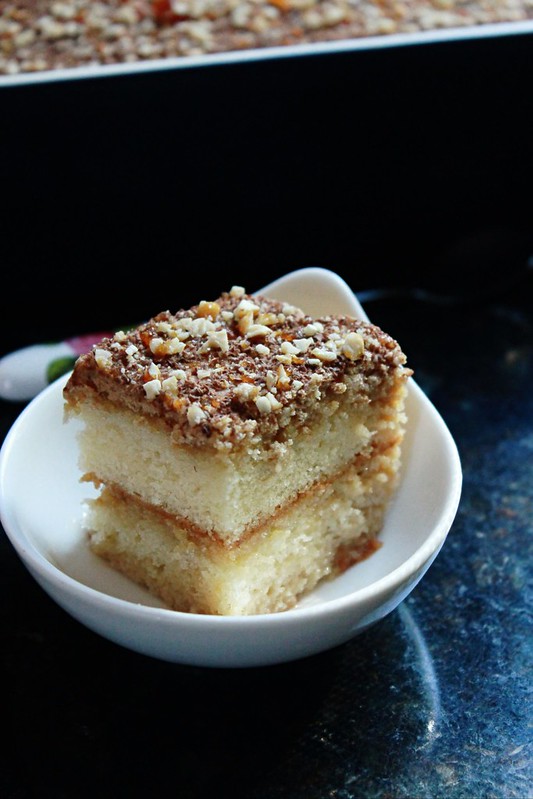
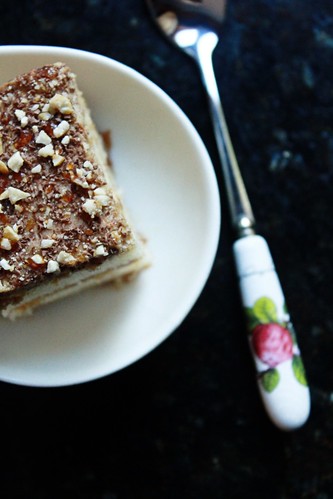
Ria's Collection: October 2018

Monday, October 29, 2018

COFFEE GATEAU

Coffee Gateau 1
When I think of a Gateau, I have a vision of a multi-layered freestanding dessert made with cake. This recipe is essentially that but it's set in a pudding dish. I made this when our dear friend Shruti came home about a week ago. She was here on a last minute work trip and when we knew she was here, we brought her home immediately!
Coffee Gateau 3
We bonded over food in 2011 and our friendship has grown so much over the past few years. We were living in two separate buildings when we first met and later ended up in the same building when we bought and moved into our condominium in 2012. We were pregnant at the same time and Kian was born 3 weeks after Ian was born. Our choice of baby names were also very similar! When we were pregnant, we used to meet each other for Tea and Shruti would bake her amazing Scones and bring them over. Our conversations were always around recipes and it still is the same!
Coffee Gateau 2
We both have the same cookbooks and know a lot of people in common that we are literally family now! One of the books we have in common is the Kottayam Ladies Circle cookbook on Snacks & Desserts. This recipe was taken from it. It's basically a Hot Milk Sponge Cake soaked and layered with a coffee-rum buttercream. If I were to describe it's taste, I would say it's a cross between a Tiramisu & Tres Leches Cake. Absolutely moist & boozy! That reminds me, I had shared a recipe for Tiramisu long back. It's extremely good and the best I've eaten till date, just incase you needed a recipe! I've also shared a Tiramisu Cake recipe as well as a Tiramisu No Bake Cheesecake recipe here very many years ago. Okay, I admit I love Tiramisu. :-)

COFFEE GATEAU
Coffee Gateau 3 Serves 15-20

Ingredients:
Hot Milk Sponge Cake 
(double recipe)

Soaking syrup:
1 cup condensed milk
1 cup water
4 tablespoon rum
Juice of 1 lime

Coffee Rum Buttercream:
100 grams butter
1 cup powdered sugar
6 tbsp condensed milk
2 tablespoon dark rum
2 teaspoon instant coffee powder

Homemade Cashew Praline & Chocolate for decoration

Method: Bake the Hot Milk Sponge Cake using this recipe. Double the quantities and bake it in a prepared 9 x 13 inch pan. Let it cool in the tin for 10 mins and after that, turn it out onto a cooling rack and let it cool completely.
Soaking syrup : Mix together all the ingredients and set it aside until needed.
Coffee Rum Buttercream : In a small bowl,dissolve rum & coffee powder together and set aside. Cream butter and sugar until pale and fluffy, 1-2 minutes. Add the dissolved coffee-rum solution and condensed milk. Fold just until it's combined. It will look curdled if overmixed.
Assembly: Spilt the sponge cake into two layers horizontally. Place one layer back into the baking dish and pour half the soaking syrup over it evenly and spread half the buttercream over. Covr with the remaining cake and repeat the soaking process followed by the buttercream.Sprinkle some praline & grated chocolate over it, cover and chill it for atleast 4-5 hours before you need it.
This is a phenomenal recipe. It makes a rich and supremely moist dessert. If you don't consume alcohol, you can omit it but that bit of alcohol makes it a little extra special. I love adding alcohol in my desserts because it enhances the taste. This cake will last in the fridge for a good while provided it's kept in an airtight container or else it will dry out. I did not serve this to Ian & Zara since it was boozy. If the booze was cooked out, then it's safe but here, it's as is.
Coffee Gateau
Since the Holiday season is fast approaching, make this for your next party and tell me how you liked it! I really love hearing back from you and thanks to all who have been sending me photos of all that you make from this blog. It's such a lovely sight!You can send the photos via email attachments, Facebook & Instagram!

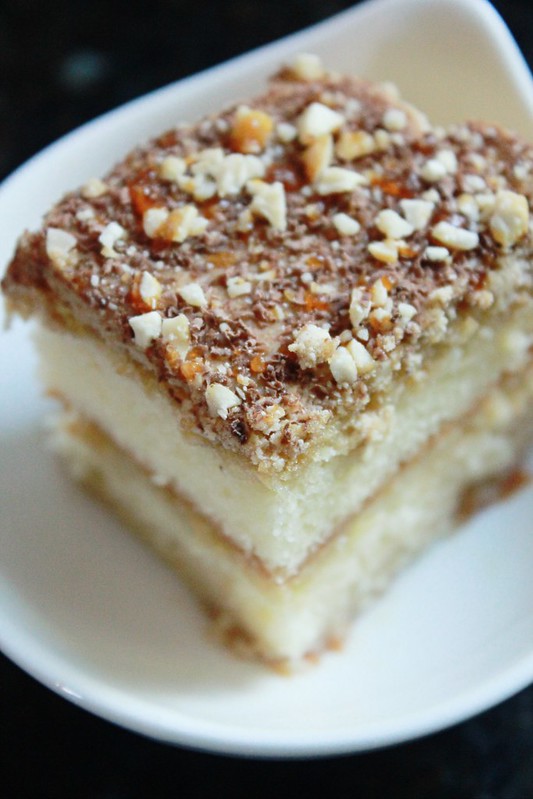
I must also mention that it's been a year since I started my YouTube channel. I've shared 7 videos so far and my Lazy Daisy Cake was the very first video. I used the same recipe for the cake base here. It makes the best sponge cake. There are more videos coming, we are working on it!

Monday, October 22, 2018

ROASTED CAULIFLOWER, ONION & BROCCOLI CRUSTLESS QUICHE

8
T
rust me when I say that this recipe is going to win hearts! It's easy, healthy and so tasty! Our kids absolutely love it and I make it atleast once a week now. It's very easy to put together and you can use the vegetables that I've used here or you can use whatever you want to. The second time I made it, I added some cooked ham to it and it was even better! I love salty things and I really love ham. The whole quiche literally vanished in seconds.
6
3

Ian is a child who wants to know if he is eating healthy enough. He asks me if it's okay to eat too much fruits & vegetables. I honestly am at loss at times to explain to him that even that could be a danger. So I just tell him the key to good health is to eat every food group in moderation. So when I make this quiche, I tell him that it's a well balanced meal. There's eggs, milk & vegetables in it.
4
Quiche in general is a rich dish. There's plenty of cream, milk, eggs & cheese in the filling and then there is butter and flour in the crust. But the choice is left upto you if you really want to follow the recipe as is or make modifications. In my opinion, cream is kind of essential to get that rich mouthfeel for the quiche. If you add all milk, it tastes light and a bit watered down. But that's just me.
1
As much as I love the traditional quiche with the crust and all, this one is equally good and extremely fast to put together especially if you can roast the veggies ahead of time. I usually make a big batch and store the remaining in the fridge. Our kids love these roasted vegetables as a snack. Bake the quiche the previous night and let it cool over the countertop. You will have fresh food waiting for you in the morning! That is if you are pressed for time. If not, assemble everything the previous night and put it in the fridge. Preheat your oven and bake it for breakfast. You can slice it right away, no need to wait for it to cool down. Sounds too good to be true, right? It is!
7

ROASTED CAULIFLOWER, ONION & BROCCOLI CRUSTLESS QUICHE
My own recipe
8
Ingredients:
Roasted vegetables
Half head of a medium cauliflower, separated into florets
One medium head of broccoli, separated into florets
One medium red onion ,sliced
Salt & Pepper
2 tablespoons Olive Oil

Quiche filling:
4 eggs
1/2 cup heavy cream
1/2 cup milk
1/2 teaspoon onion powder,optional
1/2 teaspoon garlic powder, optional
1 teaspoon dried basil
1/4 teaspoon dried red chili flakes
a pinch of ground nutmeg
Salt & Pepper

Method:
Roasted Vegetables : Spread the vegetables in a single layer onto a large cookie sheet, sprinkle salt & pepper and olive oil. Toss gently using a tong to mix. You could do this in a bowl too.
Roast the veggies at 400F for 30 mins, turning them once halfway through.
Spread the roasted vegetables in a 10 inch pie plate or a baking dish of similar size.

Quiche filling: Mix all the ingredients together and pour over the vegetables. It will barely cover the vegetables.

Bake at 350F / 180C  for 30- 35 minutes or until lightly golden around the edges and till the centre is set. There should be no liquid present. Do not overbake it, overcooked eggs have a terrible texture. You want the centre to be just set.

Slice and enjoy! You can store the leftovers in an airtight container in the fridge for 2-3 days.

To make it ahead : Assemble the quiche and leave it covered in the fridge. Let it come to room temperature as you preheat your oven. Bake as directed.
I haven't used any cheese for the filling and we honestly didn't miss it either. If you want to add some, just sprinkle some over the veggies, like a handful before you pour over the filling. Please feel free to add in chicken/ham/ shrimp etc. I would cook the protein before hand and then add it to the filling, just to be on the safer side. You can sprinkle them over the vegetables before you pour the filling.

We love this amazing quiche and I am already looking forward to the next weekend when I can make it again !

Tuesday, October 16, 2018

THE BEST HYDERABADI CHICKEN BIRIYANI

Hyd Biriyani 1
This is one dish that I have tried a couple of times at home and never seemed to win at it with Jobin. I mean, he eats anything that I serve him and eats it happily without batting an eyelid. What I am trying to say is that,whenever we eat outside and order Chicken Biriyani, we are served the Hyderabadi biriyani style of biriyani. Jobin never agrees to it being anything close to the original and calls them all Yellow Rice & Chicken. Then my question would always be ' Then how is it actually?'. The Hyderabad born and bred husband of mine has tried his best to explain to me about it's taste but for me, that's not enough to recreate it at home.
Hyd Biriyani 6
I have grown up in the Malabar eating the typical Malabari food made by the Malabari's and the amazing Kuttanadan and other South Kerala food made by Amma. I can describe and re-create all those dishes without thinking twice. Having never eaten an authentic Hyderabadi Chicken Biriyani (yet!), I was at loss on how to make it or how to improve from what I've made following the recipes from various foodblogs over the years. So gradually, I gave up.  We would rather enjoy my Malabari Chicken Biriyani than experiment upon recipes that didn't quite hit the ball out of the park.
Hyd Biriyani 4
The other day, I was lying on the couch and was planning on what to make for dinner. There was barely anything cooked in the fridge so I thought I'll make Oats for the kids and we both can eat some junk food once they sleep. Then the craving for biriyani kicked in me so badly that Jobin decided we should eat out. 'We will be disappointed as always!', was my reply. So he took the phone from my hand and started searching for biriyani recipes and then found one which looked really good and sounded like the author knew what she was doing. We both were very excited to try it and it was then that we realized that there was no chicken at home and if we were to buy the chicken and come, dinner won't be ready until 10:30 pm and our weekday bedtime is at 8:00 pm. So we ate out that night and bought some chicken on our way back home. I promptly marinated it and went to bed. The marinade smelt amazing so I knew it would end up being good!
Hyd Biriyani 2
But that chicken stayed marinating in the fridge for the next two days. We were barely home after that! So finally, on Saturday night I decided to make it. I fed the kids rice and put them to sleep on the couch as I was cooking. I followed the recipe as is because I did not want it to taste different because of me. Finally the biriyani was ready and our home was filled with it's wonderful aroma!
Hyd Biriyani 6
We took our share and sat on the floor by the sleeping kids. Just then, Zara woke up and even before she opened her eyes she said ,'Amma, enikku biriyani venam!'. Our jaws dropped. All we could do was laugh at it and feed her the biriyani that she woke up for. She had no idea that I was making a biriyani that night but woke up from her deep sleep because of the aroma! She is a big time chicken & a biriyani lover and I am not one bit surprised! Don't let the length of the recipe fool you, there's barely any cooking involved but you will be rewarded with the most amazing Hyderabadi Chicken Biriyani in the end!

THE BEST HYDERABADI CHICKEN BIRIYANI
Hyd Biriyani 4 Serves 4-5

Ingredients:
Fried Onions:
750 grams onions, sliced very thin
Oil for frying

Biriyani spice mix:
1 cinnamon stick
1 black cardamom
5 green cardamom
5 cloves
1 large bay leaf
1 teaspoon Shahjeera
1/2 teaspoon black peppercorns

For Marination:
750 grams bone-in chicken, cut up
2/3 cup thick yogurt
1 1/2 tablespoon ginger garlic paste
1 teaspoon Kashmiri red chili powder
3/4 teaspoon salt
1/2 teaspoon turmeric powder
2-3 green chilies,slit in half

For Rice:
2 cups good quality Basmati rice, washed & drained.
1 teaspoon salt
2 tablespoon olive oil

For Assembly:
1 tablespoon lemon juice
3 tablespoon cilantro, chopped
1 1/2 tablespoon mint leaves, chopped
1 teaspoon saffron (ground & dissolved in 2 tablespoon hot water)
1 tablespoon ghee

Method:
Biriyani Spice Mix : Grind all together to a fine powder using a spice grinder.
Fried Onions : Fry the thinly sliced onions until they are crisp & golden brown in colour.
Marination : Combine all the ingredients given along with 1/3 of the fried onions and biriyani spice mix and leave it covered in the fridge for a minimum of 5 hours. Overnight is best!
Rice: Soak 1/3 cup of rice in water and keep it aside for 30 minutes.
Bring 2 1/4 cups of water to a rolling boil in a rice cooker. Add salt, oil and add the remaining 1 2/3 cups rice. Let it cook until all the water is absorbed.

Meanwhile. Transfer the marinated chicken to a heavy bottomed oven proof dish about 8-9 inches in diameter. If you've used thick curd, there shouldn't be any watery marinade left in the bowl. If there is, please discard it, it will make the rice soggy.
Sprinkle the cilantro, mint ,1/2 tablespoon lemon juice and most of the remaining fried onions over it. Drain the 1/3 cup of basmati rice that was soaking and sprinkle over the chicken. This helps in absorbing the juices from the chicken and gets cooked eventually.

As soon as the rice is done,carefully transfer it over the chicken. Sprinkle the remaining lemon juice, saffron, fried onions and ghee over it. Cover it tight with two layers of foil and place the lid over it. Bake at 375 F for 1 hour.

For stove top : Heat the assembled biriyani at medium high for about 10-15 minutes and then reduce the heat to low and simmer for one hour until the steam builds up.

  • I used storebought fried onions, 2 cups worth. That way it all was all done in the oven, our stove was never used! Eaaaaasy peasy!
  • If you don't own a rice cooker, you can cook it over the stove. It takes about 15 minutes in the rice cooker.
  • The original recipe calls for 2 tablespoon lemon juice while assembling, which I felt was too strong for our liking.
  • The original recipe calls for the biriyani to be baked at 350 F but our chicken was a bit raw even after an hour, so I increased the heat to 375 F and ended up baking for another 40 minutes checking in between. So I guess, 375F would be a better temperature to bake this biriyani.

Hyd Biriyani 5
This recipe really hit the ball out of the park. It's exceptionally good. It's very flavourful and not masked with spices. This recipes is an example of less is more. The flavours of the chicken and rice really shines through.
My advice would be to use a good quality Basmati rice. We get so many brands out here and most of them are pathetic. The rice has no aroma to it, the grains are not long, some of the brands have broken ends for the grains. We buy Royal brand of Basmati and it's been very good!
So officially, I am ending my search for a Hyderabadi Chicken Biriyani recipes because Jobin really enjoyed it and couldn't stop saying 'Wow!'. The kids ate it happily and so did I !

Wednesday, October 10, 2018

COORG PANDI CURRY for 10 years of food blogging!


Pandi Curry 1

I
honestly don't know where to begin or what to talk about first. This little blog of mine turns 10 years old today. 10 years ago on this day, I started typing a recipe on a platform called Blogger, not knowing that once the post was published, the whole world could see it! I realized it after I received the very first comment ever on my very first post...a simple Chocolate Biscuit Pudding! That's all I knew (rather, didn't know!) about the whole new world of food blogging! Ritchie, my brother, pointed out that blogging might be easier than typing out recipes via emails. I just listened to him and named my blog 'Ria's Collection', the name I had given to my most precious handwritten recipe diary.

Coorg Pandi Curry 2
Now. This food blogging thing is everywhere. Everybody knows about it and everyone follows some blog or the other to get recipes and ideas. I mean, it is so common. 10 years ago, there were hardly a handful. I don't think I even spoke about it to my parents. Only when recognitions started pouring in  from all sides did I even think about telling them. I mean, it was just a thing that I did after I came back home from work...what's there to talk about it,right? :)
Coorg Pandi Curry 4
One thing I know for sure is that my intention for this space was and still is to share recipes and talk about what's going on in my life in general. I have met and interacted with so many of you via emails, chats, WhatsApp messages and even face to face at various,mostly unexpected places (think elevators!) . It always felt nice and it always made me feel that I am doing something right. I have made so many extremely good friends in real life through my food blog. What I am trying to say is that, this little space of mine on the internet has given me a whole lot more than what I have put into it. And that feels awesome! You dear readers, you have been such a wonderful bunch of people and thank you so much for still reading Ria's Collection even though I have been terrible at updating it these days.
Coorg Pandi Curry 3


Now, let's get back to business. Cooking that is! This time on our way back to the airport from Kannur, I stopped at a small store in Coorg to buy some Kachampuli & Paaputtu Thari to carry back with me to Minneapolis. But. I had to leave it behind at the very last minute due to excess weight. When I got here, our friend Z shared a bottle from his stash and there was no looking back! I went and bought some Pork that day itself and made this excellent dish!

The very first time I had this curry, I honestly didn't like it. We bought it from a lady who was selling it at a tourist spot in Coorg. It was greenish in colour and tasted really bad. But,whenever I heard people raving about it, I was convinced that there must be something good about that dish if it had to be so popular. So I decided to try this recipe at home and I am so glad that I did! It was exceptionally good!

COORG PANDI CURRY
Pandi Curry 1 Serves 6-8

Ingredients:
1 kilo pork shoulder, cut into 1 inch cubes
2 teaspoon Kashmiri red chili powder
1 teaspoon turmeric powder
Salt

For Coorg Black Masala:
4 teaspoons Coriander seeds
2 teaspoons peppercorns
1 teaspoon cumin seeds
1 teaspoon black mustard seeds

Crush together:
100 grams pearl onions
10-12 green chilies
2 inch piece ginger
10 cloves garlic
1/2 cup chopped coriander leaves

2 tablespoon vegetable oil
1 sprig curry leaves
1 teaspoon Kachampuli

Method:
Keep aside 5-6 fatty pieces of the pork and marinate the remaining using red chili powder, turmeric powder and salt for 1 hour.Dry roast the spices and grind it to a fine powder.Coarsely crush together the ingredients mentioned using a mortar & pestle or by using the smallest mixie jar.

Heat a heavy bottomed pan on medium high heat and add the fatty pork pieces. Toss them around till they render their fat. Remove the pieces and put it along with the marinated pork. There should be around 2 tablespoons of rendered fat.
If needed, add 2 more tablespoons of oil into the pot along with the pork fat and saute the curry leaves and crushed paste till its are well cooked and turns brown in colour. If it's sticking too much, add a little bit more of oil.

Add the marinated pork, 1/2 cup water,salt and cook covered until the pork is almost cooked,approximately 35 minutes. Add a bit of water if needed, it shouldn't be too dry.
Once the pork is almost cooked,add the black masala and kachampuli and cook for another 10 minutes.

By this time, the curry should be dark brown in colour. Uncover the pot and keep tossing the pieces till it turns black in colour. It should not burn, adjust the heat as necessary. It will take about 4-5 minutes.
If you want it to be a curry, add a splash of water and let it come to a boil once the pork has attained the black colour. I have made it almost dry and that's what you see in the photos above.
Serve hot with Rice, Rotis, Paaputtu, Appam, Neer Dosa, Benne Kadamputtu etc.


This curry needs attention towards the end if you want to get that authentic colour for it.  So pay close attention during the last few minutes. You most likely won't need a lot of oil since the pork is fatty and it will cook in its own fat. So don't add a lot of oil to begin with or while frying towards the end.
Now, for Kachampuli substitutes. It's a thick jet black concentrate made from Kudampuli and tastes exactly like Kudampuli. It very very strong and a little goes a long way. It's just 1 teaspoon for 1 kilo of Pork.So there is no direct substitute. Try not to use vinegar because it will only give you the tanginess and not the colour. I think, sambar tamarind would be a better substitute. Try to extract a thick paste and add according to your taste.

Our hearts were won by this dish. It's really spicy with all the green chilies, red chili powder & black pepper in it. Try it, you will love it! I served them alongside Paaputtu, another Coorg special made from rice & coconut.

It gives me goosebumps when I think that so many of you have been reading this blog of mine for a decade now. When I started writing it 10 years ago, I had just finished my Masters and started a new job as a Consultant Merchandiser for Parry Murray, UK. Then our wedding got fixed and you saw a lot of wedding preparations that were shared here. After our wedding, I moved to USA in 2010. Then three homes, a Vanitha Pachakarani title, 2 kids, various media mentions, TV shows and a graduation from Le Cordon Bleu...here I am 10 years later! The past 10 years have been one of the most exciting times in my life so far. There have been so many changes in my life and by God's grace, it's all been positive! I wonder how the next 10 years is going to be! :-) And before I forget, Happy 10th Birthday Dear Bloggie!

Thanks for stopping by! Do come back!


Related Posts Plugin for WordPress, Blogger...