Ria's Collection: No Knead Bread
Showing posts with label No Knead Bread. Show all posts

Monday, August 4, 2014

ALOO PARANTHAS ( DECONSTRUCTED )

Aloo Parantha
I adore Aloo Paranthas and so does my little family.The best part of making these for dinner is that we don't need any curry to accompany this hearty griddle bread. Sometimes, I like to dip mine in a nice spicy mango pickle but, not yogurt,as many people love to. I like yogurt with rice,better. Ian started enjoying these a few months ago and everytime I make it, he will be standing right there by the stove!
Aloo Parantha
This is not your regular Aloo Paranthas. There's no stuffing involved! Yes, you read it right! Instead, potatoes are boiled,mashed and mixed along with a fragrant herb mixture and whole wheat flour. It makes life so much easier. It's so quick to make and tastes fantabulous! It is perfect for weeknights when you don't have time to make a curry but need something filling.

I started enjoying Paranthas during my college days. Vasu, my best friend, knew a very good place in Commercial Street ( Bangalore) which made amaaaazing paranthas of every kind! Being a hard core non vegetarian, I would always order meat paranthas and they used to be heavenly! Warm,pliable whole wheat paranthas with a dollop of butter on to was a piece of heaven for us, who were literally starving in our hostels!
Aloo Parantha
I don't know how many of you have tried the meat Parantha's from a popular departmental store in Kottayam,Kerala. It is to-die-for! I've actually forgotten the name of that store because it's been a while since we went there.

I've borrowed this recipe from Mr. Raghavan Iyer's latest, Indian Cooking Unfolded.That book is a treasure chest waiting to be opened. I've bookmarked so many recipes from it by now and I don't know what to cook next. Every recipe is so well explained and everything looks and sounds delicious! Once you make these and realise how easy and quick it is, you will not go back to the stuffed version of Aloo Paranthas.
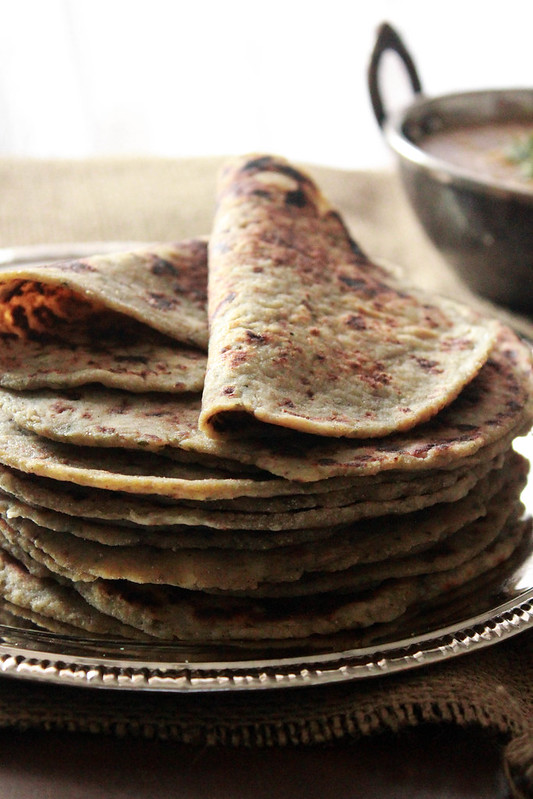
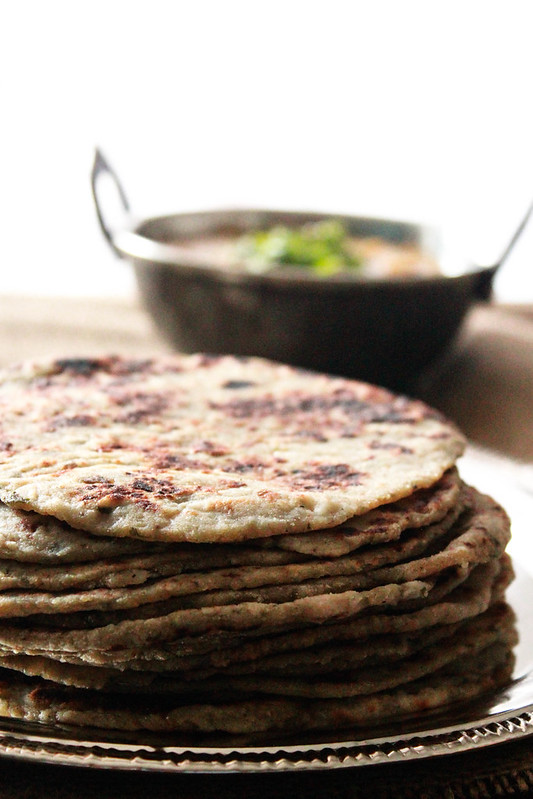
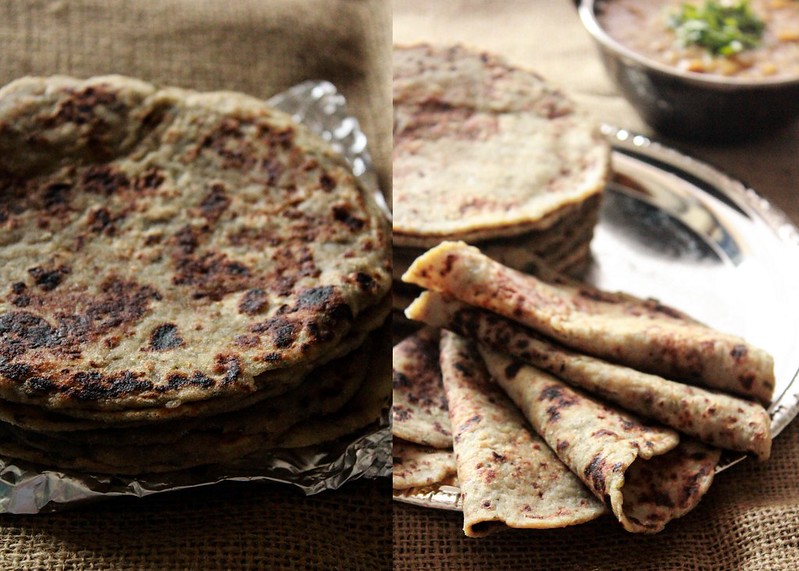
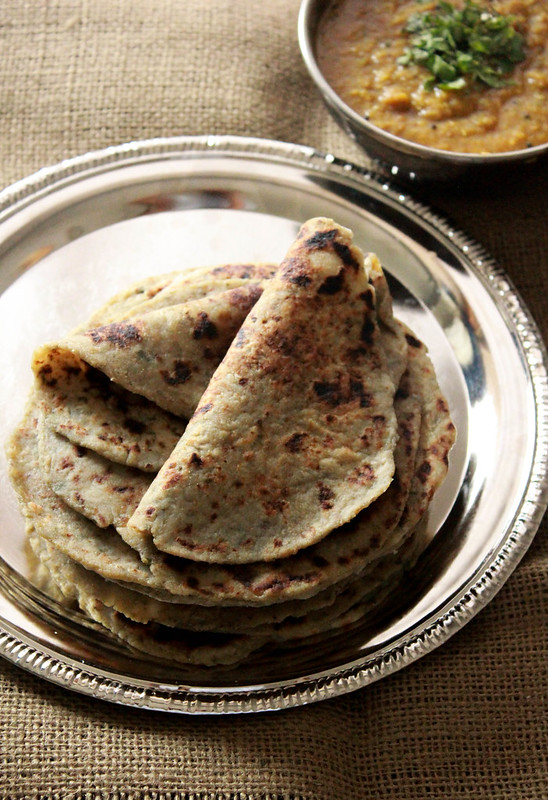
ALOO PARANTHA
Aloo Parantha
Makes 16

Ingredients:
1 pound russet potatoes
1/2 cup firmly packed fresh cilantro leaves and tender stems
1 inch piece ginger
2 green chili
1 1/2 teaspoon salt
1/2 teaspoon garam masala
1 1/2 cup whole wheat flour (atta)
Ghee

Method: Peel the potatoes and place them in a small saucepan . Add water to cover and bring to a boil over medium high heat. Reduce to medium and let the potatoes simmer, covered, until they are very tender,15-20 minutes. Meantime, grind together cilantro,ginger and green chili.Once the potatoes are cooked,reserve 1/2 cup of the hot liquid and drain the rest. Mash the potatoes very well. Add the ground herb mixture, garam masala , salt and fold it in. Add the flour and stir to mix. Add the reserved cooking liquid by the tablespoon and form a smooth ball of dough. I needed only 1/4 cup of the liquid. Divide into 16 and roll them out into discs measuring 5-6 inches in diameter.

Heat a skillet on medium heat. Place one parantha over it and cook till the surface has some bumps and bubbles and the underside has some brown spots and looks cooked, 2-3 minutes. Flip and cook the second side until it has brown spots, 2-3 minutes. Apply some ghee and turn over to sear it, about 15 seconds. Brush the top with ghee and flip the bread once again and sear the second side, about 15 minutes. Transfer the cooked bread into a hot box or you can store them between sheets of aluminium foil. These re-heat very well!
You need to make these to know how soft they are! They are incredibly delicious and like how I mentioned earlier, you really don't need a curry for this. I just placed a kadai with some Adraki Masoor Dal that I had just made (another one from his book!) just for aesthetics.
These paranthas vanish in our household. 16 never seems to be enough ! :)
  

Friday, January 24, 2014

FOCCACIA CAPRESE

Foccacia Caprese
Every time I enroll myself for a challenge of any sort, I end up missing it. I usually don't make any resolutions as the new year rolls in, but this time, at the back of my mind, I did make a resolution to not to give up on something that I have started. It could be anything from exercising to cooking. Sometime half way through last year, I came across a bread baking group on Facebook and wanted to join them to bake a bread every month. Since I was very late to join, I waited patiently till they opened up the group to welcome new members.
For this month, we all had to make a Foccacia. I love a good foccacia sandwich. That bread always called my name whenever we went out to eat. It's soft and very flavourful.
Foccacia Caprese
This recipe is a bomb! I did exactly what it called for but I am sure next time I'll skip the toppings and just make the bread with the herb oil. It is so wonderfully fragrant and gives such a subtle yet wonderful flavour for the whole bread, slice after slice.
Breads are a carb heaven and I am so not guilty about eating it. Back home, Amma,myself and Ritchie kuttan would polish off loaves of bread especially when they are hot and right from the oven. Speaking of home, we have booked our tickets for our yearly India trip and as always, I am planning on conducting a few baking classes in Kannur. If you are interested, watch out this space for more details. I am planning on something different this time.
Foccacia Caprese

We are leaving for New York on Saturday for a week and I am planning on hitting some bakeries that I always wanted to visit and catch up with friends and cousins. Once we get back, there's so much to plan for February because our anniversary is coming up and there are plenty of other cakes to bake! I really cannot wait  for it to be February! How is your 2014? Mine seems to be busy already and I am not complaining a bit!
WKTB Logo Jan '14
FOCCACIA CAPRESE
Foccacia Caprese Original recipe by Kitchen Whisperer
Adapted by Aparna
Makes 2 medium sized Foccacia
Serves 4-6 people

Ingredients:
For the bread:
2 teaspoon instant yeast
1 1/2 tablespoon sugar
3 1/2 cups bread flour (All purpose will also work)
1 teaspoon salt
1/4 olive oil (regular also works)
1 - 11/2 cups warm water
A little more olive oil for brushing the dough

For the topping:
4-5 roma tomatoes (depends on the size, I used just one)
1 small ball of fresh mozzarella cheese,cut into 1/4inch slices
1/2 cup fresh basil,cut into thin strips

For the herb oil:
1/4 cup olive oil
1 teaspoon dried basil
1 teaspoon dried oregano
1/2 teaspoon red chili flakes
1/2 teaspoon garlic paste
Salt to taste

Fresh basil for garnishing

Method:
Herb oil : Mix together all the ingredients in a small bowl and set aside.
Bread: Mix together all the ingredients though olive oil and then add in the warm water and form a soft elastic dough that is just short of sticky. Take the dough out, oil the bowl with some extra olive oil, put the dough ball back in and coat it by turning the dough a couple of times. Cover and let rise until doubled,about an hour.
Pre heat the oven to 210C / 400F. Once it is risen, take the dough out and divide into two. Place them on a cookie sheet and press it out gently into a rectangle of 1 inch thickness.Let it rise for 20 mins. Slightly oil your fingers and poke into the dough at equal intervals to create a dimpled effect. Brush the top of the bread with the herb oil, generously. Bake for 18-20 mins or until golden brown.
Take the bread out and increase the baking temperature to 230C/ 450F. Brush the bread with some herb oil and top it with cheese and tomatoes. Lightly drizzle the remaining herb oil over it and let it bake until the cheese has just melted. Garnish with basil leaves and serve warm.
I cannot even begin to tell you how delicious this bread is! We loved it so much that I regretted for not making more.I can actually have this for a meal,even though I made some Cream of Mushroom Soup with it.Ian loved this bread,so it was a winner in every aspect!
If only God made Potatoes, Bread & Desserts the most nutritious thing on Earth! :)

Sunday, October 13, 2013

NO KNEAD ARTISAN BREAD

HOMEMADE ARTISAN BREAD
There was a time in my life when I thought I would never find a liking for artisan breads. I always loved the soft,supple bread loaves we used to get from our local bakeries in Kannur. If you go there are around noon or by 3 pm-ish, you will get hot breads which you will be juggling between your two palms because it is really that hot...straight from the 'borma'. I've never,tasted any bread which tastes as good as that bread in the US.I don't think I ever will. The breads we get in the supermarkets here have some sort of an artificial taste...all the brands,some more,some less.
HOMEMADE ARTISAN BREAD
Now, the story is different. I absolutely love artisan breads. They are firm and crackly on the outside but soft and full of holes inside.The holes help in mopping up any sauce that you want to.I love to dip a chunky slice in some good olive oil with a drizzle of balsamic vinegar and finally topped with some Parmesan. When I bake these breads at home,I can hardly wait for it to cool down. So does little Ian. He loves these kind of breads.He eats it as is but I like my first slice with butter or some good berry jam.
HOMEMADE ARTISAN BREAD
I knew about Zoe and Jeff  when I was in India. That's when their book Artisan Bread in 5 Minutes A Day was released.I was even more excited to learn that they both lived in the area I was about to move into...Minneapolis.This is the Master recipe from that book. So,after getting here,I enrolled for a baking class with them and learnt to bake bread from the best! You can read about that here.
NO KNEAD ARTISAN BREAD
HOMEMADE ARTISAN BREAD
Ingredients:
3 cups of lukewarm water
1 tablespoon yeast
1 - 1 1/2 tablespoon salt
6 1/2 cups all purpose flour

Method: In a large 6 quart  plastic bowl / container with lid, mix together the flour, yeast and salt. Add in the water all at once and stir to form a dough.It will be a sticky dough. Cover the bowl with a lid,but not tightly shut, and let it sit at room temperature for 2 hours.DO NOT punch down the dough,it will would have risen but flat on top. After that, refrigerate the dough overnight. You will notice that the dough has collapsed which is normal.It will not rise again. Sprinkle some flour over the surface of the dough,pull and cut off a 1 pound chunk of it. Shape it and let it rest on a parchment for 40  minutes.
Preheat the oven to 450 F along with the baking stone and a metal tray in the lowest shelf. Slide the shaped dough onto the baking stone and pour one cup of hot water into the metal tray .Bake for 30-35 mins or until deep brown in colour. Remove the parchment after 20 minutes of baking so that the bottom gets a chance to crisp up. Once baked, remove it from the oven and let it cool completely before slicing in.Enjoy!

The leftover dough can be refrigerated and will remain fresh for 2 weeks. It will develop sourdough characteristics during the course of 2 weeks.
If you have any leftover bread, put the cut side down on a plate and leave it. You don't have to cover it.

Like I mentioned before, we really enjoy artisan breads. I am so glad that Little Ian also shares the love for this carb heaven! He was running around when I was photographing the bread and every once in a while he would stop by and point at the bread asking for me to cut and share a slice with him. So the slice with the jam, that you just saw above, was shared by the two of us later!

This wonderful loaf is Yeastspotted!
 
Related Posts Plugin for WordPress, Blogger...