Ria's Collection: 2019

Tuesday, December 17, 2019

OREO TRUFFLES

Oreo Truffle
This takes the #1 spot on the most requested items during Christmas season from Ian. Every time I mention the word 'Christmas Party', he makes sure that I have written this item on my to-make list. I usually don't make the Christmas treats throughout the year, it's made only around the last week of November.It's just to keep the excitement going and to have some special treats around the house during the most lovely time of the year!

Oreo Truffle
It's funny how they know which aisle carries the cookies when we go grocery shopping. For Ian, it's easy since he can read but Zara kind of takes a cue from her elder brother and tells us which direction to push the cart! They hold on to that precious packet of Oreo cookies as if it's the last packet on the face of this planet! I cannot blame them, I rarely buy packaged stuff for them due to the long list of ingredients that goes into making most of them.
Oreo Truffle
These Oreo truffles are delectable little bites of heaven! I have to admit that I have lost my sweet tooth off late which  I am extremely happy about but that doesn't really stop me from enjoying these treats once a year. They are so easy to make and looks very pretty when served on a platter. This is a simple recipe that you can make along with your kids. To make your life easier, use a 1 tablespoon measure cookie scoop, if you have one. I use them and it makes the process really fast! You can decorate these Oreo Truffles with sprinkles, dragees, chopped toasted nuts or even drizzle them with chocolate. I have been seeing a whole lot of different ideas like making an Ornament, a Snowman, a Reindeer etc using these as a base on the internet.
Oreo Truffle

OREO TRUFFLES
Oreo Truffle Makes 25-30 pieces

Ingredients:
400 grams Oreo cookies
225 grams cream cheese, at room temperature

450 grams almond bark / compound chocolate of your choice

Method: Blitz the cookies to a fine powder along with the cream. Dump the powdered cookies into a large bowl,add the cream cheese to it and mix well to combine. You can use a food processor or a hand mixer for it.
Form them into 1 tablespoon sized little balls and freeze for 25-30 minutes.
Line a cookie sheet with parchment paper.
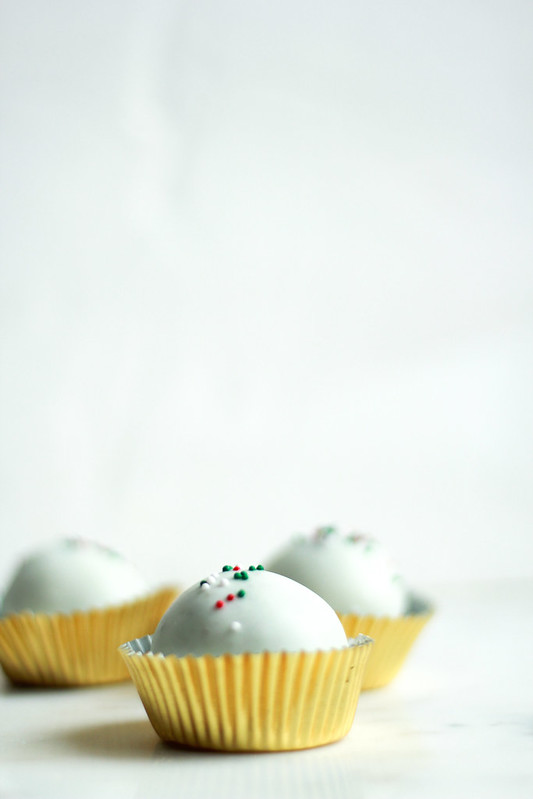
Melt the coating chocolate as mentioned on the package and dip the frozen cookie balls in it one at a time with the help of a fork. Place the dipped cookie balls carefully over the parchment paper, sprinkle with toppings if needed and let them chill in the refrigerator for an hour. Once set, transfer to a container and store in the fridge until needed. Serve cold.

If you want to drizzle melted chocolate over it, do so once the dipped truffles are fully set.
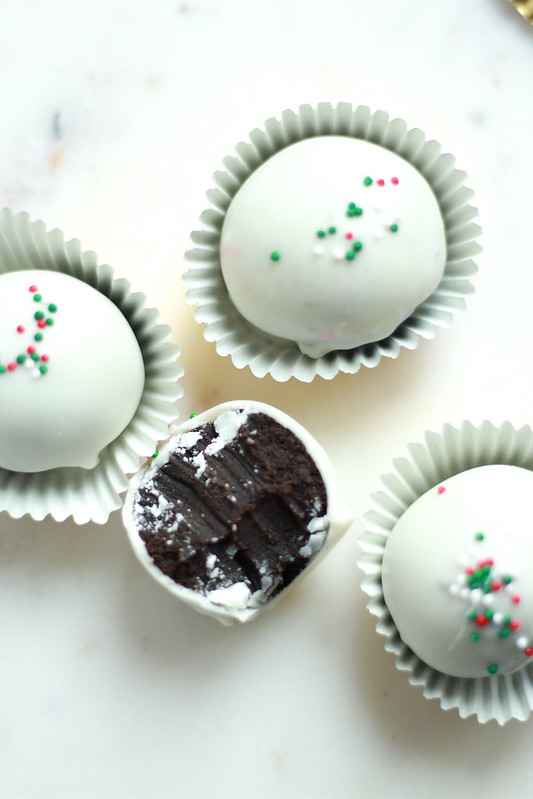
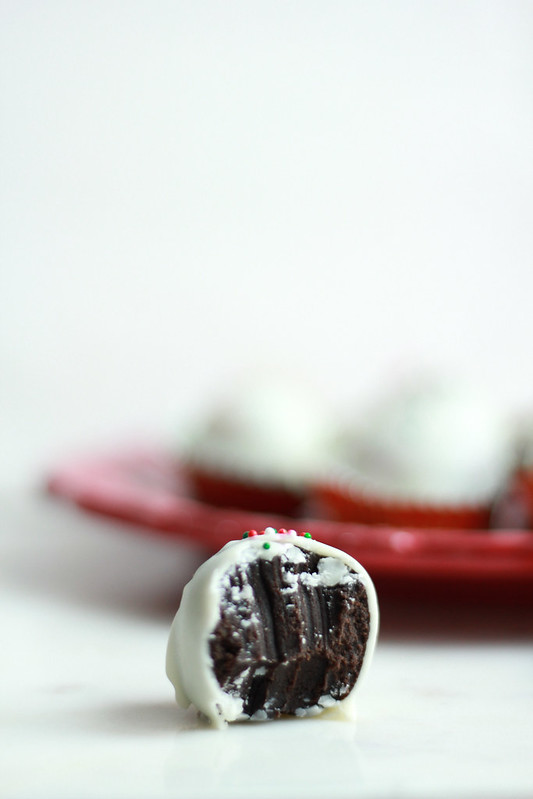
I like to use white chocolate for dipping the truffles, not only for the taste but for the contrast in colours especially when bitten into.


Oreo Truffle
I wish I could pinpoint a source that I got this recipe from, it's pretty much all over the internet. When I first made them, I followed a recipe I found online but this year I went with my own proportion of what I thought would be right. I didn't want to have extra cookies lying around the house. The Oreo packages we get here are pretty big in size, so use one packet that weighs 400 grams. I've used the regular kind here, not the double stuff. I feel that might make the truffles a bit too soft with the extra filling inside the cookie.

Do give this recipe a try this year. I am sure your kids would give you an extra hug for it...I am talking from experience! ;-)

Wednesday, December 11, 2019

NAADAN KOZHI PIRALEN

Nadan Kozhi Peralan
I've been busy as a bee for the past couple weeks with all the get togethers that we've been hosting. Now that we are done with all of it, I feel like I have all the time in the World! So naturally,my first thing to do would be to come here and take a sneak peak as to what's going on. I actually had taken these photographs a few week ago to share them here but got the time for it just this morning. Once I am done with this post, I need to start packing for our upcoming vacation that we have been planning for almost a year now. Minneapolis is so cold right now so I am happily looking forward to that warm destination!
Nadan Kozhi Peralan
This is a life-saver of a curry. I've made this countless number of  times in the past and it turns out perfect each time. This recipe is from a cookbook 'Suriani Pachakam' by Mrs. Bava Lukose. I love this cookbook because whatever I've made from it over the last few years have been delicious! Bava aunty and I have exchanged many emails and even know many common people in between. Amma has met her twice or thrice already...I wonder when I will get to meet her finally!
Nadan Kozhi Peralan
It's such a quick curry to put together and goes with pretty much with everything that you can think of! I mean, chicken curry is something I like to pair with most things. Whenever a chicken curry is made at ours, it kind of gets over the same day unless I portion out some and keep it aside before it's served. Usually, that happens over a weekend when there's a movie being played on the TV and a glass of wine in hand. We rarely watch TV shows nor movies on a regular basis, it's just a weekend thing for us. I somehow don't get the time to sit in front of it to catch up on all the latest stuff, not even Food Network these days. I am also not willing to compromise on my sleep either! :-)

NAADAN KOZHI PIRALEN
Nadan Kozhi Peralan Serves 5-6

Ingredients:
1 kilograms chicken, cut into medium pieces
1/4 cup coconut oil
1 cup sliced onions
1 tablespoon vinegar
3 sprigs curry leaves
Salt

2 tablespoon ground coriander
1 tablespoon Kashmiri Red Chili Powder
1/2 teaspoon turmeric
1/2 teaspoon black pepper powder
1/2 teaspoon fennel seed powder
8 green cardamoms
4 cloves
1/4 cup sliced pearl onions
2 tablespoons garlic
1 tablespoon ginger

Method: Grind together all the ingredients from coriander through ginger to a smooth paste.
Heat oil in a large pan on medium high heat and sauté the onions until soft. Add the ground paste and sauté well for 2-3 minutes. Add the chicken, curry leaves, vinegar and salt. Mix well and add 1 cup water. Cover and cook until the chicken is fully cooked and the gravy is thick. Serve hot!

The last time I made this curry, I served it alongside Chapatis. We enjoy that combination a lot and it reminded me of an incident when I was a 5 year old. I clearly remember Amma had served me something to eat for breakfast, which I now think was Dosa & Chammanthi and I refused to eat it. She tried to convince me but since I didn't budge, she told me that I will not be given anything else to eat for breakfast until I eat a bite of that. I remember crying my eyes out and that's when Mamma came home. I ran to her to complain that Amma didn't give me anything to eat. I was so excited when Mamma asked Amma to feed me something else.

Then Amma served me a plate of Chapati and Beef curry with potatoes in it. I fell in love and I am still in love with Chapathi and any non vegetarian curry! That combination is amazing!

Monday, November 18, 2019

GARLIC PARMESAN PASTA with CHICKEN & MUSHROOMS

Garlic Parmesan Pasta2
Ihave lost count of the number of times I've made this recipe in the last one year. It is such a favorite amongst us and I even made it this time when I went home. Our little ones love pasta and even we enjoy it when made well. There are somedays when Ian & Zara asks me to make this particular dish. They both LOVE mushrooms so much that I think they sometimes eat this just for the yummy mushrooms that goes into this dish. It's very easy dish to make and they make great leftovers too!
Garlic Parmesan Pasta 3
You just need a few ingredients and by that I mean, pretty rich and tasty ingredients to pull this together. I made this for our annual Christmas party last year for the kids because most kids that we hang around with love pasta. And I still continue to make this very frequently for my own. Ian loves it so much that he asks me often if I've noted down the recipe somewhere so that he can recreate it when he grows bigger. Zara makes sure that there's enough of mushrooms in the bowl of pasta that I give her.
Garlic Parmesan Pasta
Growing up, I disliked everything about mushrooms. I think it was because of the way it was made...in it's whole form. I like them sliced thinly and sautéed in some butter or olive oil along with some salt and pepper until they reduce in size and turn brown in colour. That flavor is SO good! Now, whenever we go out and if I am ever in doubt of what to order...if there are mushrooms on the menu, then there's no looking back! I love adding them even to my Risotto, which is another much loved dish by the children. I found this recipe on Alyssa's blog and decided to toss some pasta along with it . Best decision ever!
GARLIC PARMESAN PASTA with CHICKEN & MUSHROOMS
Serves 4

Garlic Parmesan Pasta 1
Ingredients
4 boneless skinless chicken breast / thighs, thinly sliced
2 tablespoons olive oil
Salt & Pepper
8 ounces white / baby bella mushrooms, thinly sliced

Creamy Garlic Parmesan sauce:
1/4 cup unsalted butter
2 cloves garlic, minced
1 tablespoon all purpose flour
1 cup heavy cream or half and half
1/2 cup chicken broth
1/2 cup Parmesan cheese
1/2 teaspoon garlic powder
1/2 teaspoon salt
1/4 teaspoon black pepper powder
1 cup spinach, chopped
8 ounces pasta of your choice, cooked al dente*

Method: In a bowl,sprinkle chicken with salt and pepper.In a large skillet on medium high heat, heat olive oil and cook the chicken for 3-4 minutes until they are golden brown on the outside. Remove onto a plate and set aside.Into the same pan, add the sliced mushrooms and saute well adding a pinch of salt and pepper till it reduces in size and turns brown. Remove onto a plate and set aside.

To make the sauce, add the butter to a pan on medium heat and when it melts, add the minced garlic and saute for 30 seconds. Add the flour and mix well to cook for another 30 seconds. Add the heavy cream, chicken broth, parmesan cheese, garlic powder, salt and pepper. Cook stirring till it begins to thicken. Add the spinach and cook until it wilts, 30 seconds.
Add the cooked pasta, reserved chicken & mushrooms and toss well to mix. Serve hot!

* Reserve about 1 cup of pasta cooking water, incase you need to thin out the sauce later.
For this recipe, you can use bottled grated Parmesan cheese or you can grate your own. It doesn't make that big of a difference. I've tried them both since I've made this dish way too many times already! I always use homemade chicken stock because it's pretty much a staple in our fridge. You can use storebought as well. I haven't tried substituting it .You can serve the chicken not just with pasta but alongside buttered rice, toasted bread, mashed potatoes etc. I started with pasta and it's stuck with pasta forever I guess! ;-) I hope you try this and enjoy it as much as we do!

Wednesday, November 13, 2019

STICKY DATE TOFFEE CAKE with HOT TOFFEE SAUCE

STP
I've been baking a very similar cake for over 8 years now and we love it! I got that recipe from my cousin Roshini a long long time ago. After she got married, they moved to Australia, the place where this cake is the most popular. Roshini used to tell me via our chats that she tried a new recipe for the same and it was even better than the one she had shared with me many years ago.Somehow, I never got hold of that  'new' recipe from her. Years passed by and we both barely get any free time to chat about our new recipes and what we have been writing down in our recipe diaries. She has two little ones and so do I, so that's pretty self explanatory! :-)
STP 1
Last weekend, we had a lovely newly wed couple over for dinner. I usually start any party prep by making the dessert first because it somehow sets the tone of the party right. But last Saturday was a super busy one for us and by the time we were home, it was around 5:00 pm. I still hadn't made the dessert! So I quickly glanced through my cookbooks in our home library and came upon this beautiful recipe for a Sticky Date Toffee Cake by Marcy Goldman. Her book Passion For Baking is truly a treasure for any baker!
STP 6

This recipe can be made in no time at all, provided you have the ingredients on hand, especially dates. Since this cake can be served warm, it is perfect to make it at the last minute. It can be made extra special if you can have a scoop of vanilla ice cream alongside the cake. I love the hot and cold combination, it never gets old for me. Plus,this cakes makes for a great Fall & Winter dessert! One of the first recipes I've tasted from Marcy's book was the first every cake Jobin baked for my birthday in 2010 - Finnegan's Chocolate Cream Cake. You should check that out if you are looking for a good birthday cake.
STICKY DATE TOFFEE CAKE with HOT TOFFEE SAUCE
STP 5 Makes 12-14 servings

Ingredients:
Cake
1 1/2 cups pitted dates
1 1/2 cups water
4 teaspoons pure vanilla
1 teaspoon baking soda
1/2 cup unsalted butter,softened
1 cup firmly packed light brown sugar
1/4 cup white sugar
2 teaspoons orange zest
3 large eggs
2 cups all purpose flour
1 1/2 teaspoons baking powder
1/4 teaspoon salt

Hot Toffee Sauce
3/4 cup firmly packed brown sugar
1 cup whipping cream
1/2 cup unsalted butter, softened
1/2 teaspoon pure vanilla

Method:
In a medium saucepan, simmer dates in water and vanilla until they are soft and mushy. Remove from heat and stir in baking soda. Let it cool.
Preheat the oven to 350 F and prepare a 9 inch round cake tin.
In a medium bowl, cream together butter and both sugars along with orange zest until fluffy. Blend in the eggs one by one and then fold in flour, baking powder and salt. Blend well. Add dates and mix well to combine. Pour the batter into a prepared pan and bake until just set, 40-45 minutes.
Meanwhile, make the sauce by simmering together brown sugar, cream and butter for 5 minutes. Stir in vanilla.
When the cake is done, poke holes all over with it a skewer and then drizzle the sauce onto the warm cake. Serve warm or at room temperature. 
STP 4
The aroma that fills your home while baking this cake is something that you should experience. It's fantastic! The batter bakes up into a moist, soft cake and the orange zest adds such a lovely touch to the overall taste of it. Ian kept hovering around our oven asking when the cake was going to be ready. I wasn't sure if I should let him know that there were dates in the cake because it's one of the very few things he has kept aside to eat when he grows bigger! ;-)
I find it hard to not tell the kids what I am serving them because I would personally like to know what's on my plate. So I told him about the dates and as always, he said he will try it. And guess what..he couldn't stop himself from finishing the slice I had served him! The next day, he woke up whispering into my ears asking if he could eat one more slice after breakfast!! It's THAT good! :-)

Sunday, November 10, 2019

OVERNIGHT YEASTED WAFFLES

Waffles 1
When I came to this country close to 10 years ago, it was an experience in itself. I am not talking about the culture, fashion or anything outwardly but I am talking about shopping for all the wonderful ingredients that I had been reading all my life in cookbooks that Mamma & Amma owned and all those wonderful kitchen appliances that I had been dreaming of using in my kitchen! Waffle maker called my name but at the same time I wasn't really sure if I should get one for us because how many times would you actually use it, right?

If you know me atleast a little bit personally, you will know that I cook a lot on a daily basis. But if you were to come to ours someday, there will hardly be any appliances to be found. Infact, I don't even own that many pots and pans for the same reason.
Waffles 3
And that reason being...I cannot function in a cluttered environment. It honestly makes me feel so lazy inside. I need my counter tops to be empty at all times and with a shiny surface! I am constantly arranging and rearranging things to make space even when I don't own that many things! This is kind of growing with me as I grow older! :-) So inorder to avoid cluttering my kitchen shelves, I usually wait for months and sometimes even 10 years to actually buy an appliance...like a waffle maker!

Our little ones are forever hungry and they are such amazing food loving children. So it's actually a pleasure to cook for them. But these days, their requests are non-stop and I feel like a machine especially once Ian is back from school. Then even Zara's appetite hits the roof!
I don't enjoy cooking the same thing over and over again. So constant food requests plus my problem of not enjoying making the same thing over and over again kind of led me to buying a waffle maker a couple weeks ago.
Waffles 4
When I brought it home, the kids were too excited to wait for me to make it over the weekend. So, I quickly glanced through the Cuisinart Belgium Waffle Maker manual and used a recipe which sounded really good to me. I mean, how can you go wrong with flour, butter, eggs & a pinch of sugar! This is honestly THE best waffles that we've eaten in our lives. They are thick, crisp on the outside and very soft and tender...almost like a set custard in the centre. SO GOOD!

OVERNIGHT YEASTED WAFFLES
Waffles 2 Makes 8 waffles

Ingredients:
2 cups milk
1/2 cup unsalted butter,cubed
2 1/2 cups all purpose flour
1 1/2 teaspoons active, dry yeast
2 tablespoons granulated sugar
1/2 teaspoon salt
2 large eggs
1 teaspoon vanilla

Method:
Warm milk and butter together in a small saucepan. Once the butter has melted, remove and cool until just warm.
In the meantime, whisk together flour, yeast, sugar & salt together in a large bowl. Add the warm milk to it and whisk to combine. Add the eggs and vanilla and whisk until combined. Cover the bowl and let the batter chill in the refrigerator for atleast 12 hours and upto 24 hours.
Pre heat the waffle maker to desired setting.
Whisk the batter to combine,it will deflate and that's OK. Pour 1 heaping cup of batter onto the centre of the lower grid of the preheated waffle maker; spread the batter evenly using a heatproof spatula. Close the lid and cook until the tone sounds.
Remove them carefully and serve immediately with a dusting of powdered sugar / maple syrup and some fruits.

* The first time I made these, I got exactly 8 waffles. The second time I made it, I made the first 4 for the kids and then wandered about doing other things. So when I came back the batter had risen again because of the yeast and I ended up with 12 waffles in total!
* You can freeze the waffles and reheat them on a rack in a 200 F oven for 5-6 minutes.

This is an excellent recipe when you have company because the batter can be made the previous night so you can take your own sweet time to wake up in the morning and the breakfast is done in no time at all! I must mention that the waffle iron does take a little while to heat up, so just keep that in mind.
I am thinking of doubling the recipe next time onwards so that I can freeze the extras for the coming days or for the days when the kids request for snacks after snacks!

My family only had one word to describe these … 'Amazing!'

Thursday, October 31, 2019

KUTTANADAN DUCK ROAST

Duck Roast 1
There was a time when I thought that my Instagram inbox would literally get stuck with the number of photos I was getting from you readers after making my Amma's Kuttanadan Chicken Roast. It's a phenomenal recipe and I cannot tell you how much it's been loved by everyone! Everytime I hear the word Chicken Roast or Duck Roast, it has a festive feel to it. Now that Christmas is literally around the corner, I thought I'd share my favourite Duck Roast recipe with you all so that you can put that one on your Christmas Menu this year! I don't know about you but my Christmas party menu is ALL set, already! So if you are like me and plan menus a over a month ahead of time, you are my people! :-)
Duck Roast 3 (1) (1)
I've made this recipe a number of times already and it gives consistent results each time. There's barely anything to do at all but at the end of it, you are rewarded with the most tastiest Duck Roast ever! I made this today to serve alongside Appam. So I made the gravy a little more loose than I would if I were to serve it with rice and kachiyamoru. So go with what you need it for. Usually duck is sold with skin-on. We use it as is and that's the ideal way to get the maximum flavor for the curry. I buy our duck from the Oriental store but the duck we get here are heavy on the skin and fat so I trim any excess or loose skin and discard it. I don't use the giblets,that also goes into the bin.
Duck Roast
We are a duck-meat loving family. When I was in India, our duck always came from Pallikuttumma. It was and still is the most tastiest duck that I've ever eaten. The meat is dark and so good! Whenever we go to Pallikuttumma, Achamma aunty will make sure there's a duck curry on the table especially for Appa. Since Appa loves it so much, Amma would buy some and freeze it to take with us to Kannur. Amma's most favourite way of cooking a 'Tharavu' is by using her Ammachi's Tharavu Piralen recipe, which I agree is my favourite too!
Duck Roast 2
Velliammachi passed away when I was three, around Zara's age. So I don't recollect eating anything that she made with her hands. I personally feel, heirloom recipes are the best possible ways to taste what your ancestors cooked. So whenever Amma makes Tharavu Piralen and whenever I make it at home, it gives me an extra special feel and I make that curry with the utmost care, love and attention.
While today's dish is Duck Roast which by the way is a recipe from one of my most used cookbooks - Ente Tharavdu Pachakam by Aswathy Mathan, it is again an heirloom recipe from the author's family. No wonder it tastes exceptional!
KUTTANADAN DUCK ROAST
Duck Roast 1 Serves 4-6

Ingredients:
1 kilo cleaned & cut duck

1 tablespoon white vinegar
1 tablespoon khus khus,soaked in 2 tablespoon water
1 tablespoon ground coriander
1/2 tablespoon Kashmiri chili powder
1 teaspoon garam masala
1 teaspoon turmeric powder
6 cloves garlic
1 inch piece ginger
2 medium onions
10 pearl onions
1 1/4 - 1 1/2 teaspoon salt

1 teaspoon ghee
1/4 cup coconut oil
1 tablespoon sliced pearl onions
Curry leaves
Thinly sliced fried potatoes, optional

Method: 
Grind together all the ingredients from white vinegar through salt into a fine paste. You don't have to add water, onions will take care of it.
Into a large pan, add the duck pieces and pour the ground paste over it. Mix well and let it marinate for an hour. Once the time is up, add 1 cup water and cook the duck covered on medium heat until it's almost cooked,about 35 minutes. Separate the almost-cooked pieces from the gravy.
In a large pan, preferably with tall sides to avoid spluttering, heat the coconut oil and add a couple sprigs of curry leaves. Add the duck pieces to it,a few pieces at a time and fry until golden on all sides. Repeat until all pieces are fried.
To the remaining oil, add the ghee and saute the sliced pearl onions. Pour the reserved gravy into it along with the fried duck pieces and let it come to a boil. It will thicken very quickly and darken in colour as well.
Adjust the consistency as per your need. Check for seasonings and serve garnished with thinly sliced and fried potatoes on top!

I cannot tell you enough how much I want you all to try this recipe. It's so good! Like I mentioned earlier, the gravy consistency is upto you. If it's to be served with Appam, it needs more gravy, so stop as soon as the gravy and pieces come to a boil. If you want to serve it with rice and kachiyamoru (deadly combo!!!), reduce further till the pieces gets coated with the gravy.

Ian and Zara love Duck Roast as much as we both do! Usually one kilo of chicken last for atleast two or three meals but when it's Duck Roast, it vanishes!

Wednesday, October 23, 2019

ALMOND SHORTBREAD

Almond Shortbread 5
Shortbreads are a quick and easy treat to bake so I make it quite often. Our children love it, we love it and everyone who eats them seem to enjoy them. I usually have a few logs of frozen shortbread dough to bake up at the last minute when we have someone coming over or as an after-school snack. I've baked them with many flavor combinations as well. Today, I am sharing with you a recipe that I discovered recently, an Almond Shortbread...a sweet something special for my blog's 11th birthday!

Almond Shortbread 4
I chanced upon this recipe in a cookbook called Sweet by Valerie Gordon that I borrowed from our public library during one of our recent visits. It's a very straightforward recipe just like my basic shortbread recipe. It's rich and buttery and crisp! While baking these,make sure you bake them just until they are golden around the edges and firm to the touch. You should be able to lift it up,turn it over and see that the bottom is also golden. If you bake it any further, it ends up being very hard.
Almond Shortbread 1
If you are a beginner at baking cookies, this would be a good place to start. It's not that cookie baking is rocket science but straightforward recipes like these are hard to go wrong with. Also, please invest in a good, heavy baking sheet. I personally feel lightweight tins don't yield good results. They end up giving your cookie a burnt underside when the top is barely done. Also, lining your cookie sheets always gives you a better results unless the recipe clearly states that you don't have to line it, which is usually in the case of very buttery cookies.
ALMOND SHORTBREAD
Almond Shortbread  Yields 50 small cookies

Ingredients:
1 cup all purpose flour
3/4 cup toasted almond flour *
8 tablespoons unsalted butter, room temperature
1/4 cup light brown sugar
1/4 cup granulated sugar
1/4 teaspoon salt
1 teaspoon vanilla

Method:
Whisk together both flours and set aside.
In a large bowl using a hand beater, cream the butter and sugars on medium speed until light and fluffy, 3-4 minutes. Add the flours 1/2 cup at a time mixing thoroughly after each addition.Add the salt and vanilla and mix for 30 seconds.
Turn the dough out onto the counter top and divide it into quarters. Roll each piece into a log measuring about 1 inch thick and 6 inches long. Wrap the logs in plastic wrap and chill / freeze until needed.
Pre-heat the oven to 350F and line a cookie sheet.
Slice the logs into rounds approximately 1/3 inch thick and place them on a lined sheet, 2 inches apart from each other. Bake for 15-18 minutes or until golden around the edges. Cook on the tin for 10 mins. Remove carefully and transfer to a cooling rack to cool completely. Store in airtight tins.

* To make toasted almond flour : Spread the almond flour on a baking tin and bake at 350F for 6-8 minutes. Cool and use as needed.
Almond Shortbread 2
These cookies are perfect with a cuppa! They have a slight caramel undertones from the brown sugar that's used in the recipe. Ian is not very fond of nuts in it's direct form but loved these cookies. You can dress these up further by dipping a fork in melted chocolate and drawing some lines over the cookies or simply dip half the cookie into melted chocolate, dark or white! Plain or dressed, these will win your hearts for sure!

Wednesday, October 2, 2019

BIRTHDAY UPDATES

This year has taken us to many places. We've been travelling pretty much every month and sometimes even thrice a month! It's been very hectic packing and unpacking with all of the laundry in between. I feel packing is definitely more fun than unpacking,especially after a few months trip to India. The amount of clothes that needs to be put away is crazy!

Jobin Ria
While I was missing from this space, we got to celebrate all our 4 birthdays! This year Jobin's birthday was celebrated in San Francisco with store bought cupcakes! It was way too crazy to pack his cake/ lamingtons with us as we were in California for three nights and all three were spent at different hotels! So you can pretty much imagine how that cake would have been by then. :-)

My birthday was at our home in Minneapolis and it was houseful! Jobin's sister and family, his cousin and family and his mom were at home then. I was really skeptical if Jobin & kids could bake my cake this year with all the commotion at home. They asked me to choose what kind of cake I wanted and I chose a simple yellow cake with chocolate buttercream. They made it and it was literally the best cake I've eaten so far in 2019.

Ian Cake
Ian's birthday was celebrated twice this year. One in Kannur with his Appuppa & Ammumma and the other one with his friends from school once we reached back to Minneapolis. For the first one, I made a number 7 chocolate cake with chocolate frosting and for the 'Pizza & Cake' party at home, I made a police themed  vanilla cake with lemon buttercream frosting. He loves tart things now, especially lemon.

Zara Cake
For Zara's birthday party, we had two cakes. One for the real birthday and one for the party. She is crazy about a character called ' Nina' from a YouTube cartoon called Pocoyo.So for the real birthday, I baked a chocolate cake with chocolate frosting and it had Nina's face on it. For the Brunch party, I baked the same cake again and it had a standing Nina over it. She was literally the most happiest person on earth that day! I also stitched her birthday dress this year. It was a simple dress with balloon skirt and roses by the yoke. I remember wearing balloon skirts when I was little so I wanted her to have one too!
Zara's Third Birthday Party Menu
Homemade Jelly Tarts
Lemon Tart
Butterscotch Tarts
Pumpkin Scones
Ham & Cheese Scones
Savoury Muffins
Lemon Macarons
Brigadeiros
Coconut Candy
Paneer  Mousakka
Cucumber & Mint Bread Salad
Maple Glazed Cinnamon Rolls
Mushroom & Onion Quiche
Carrot Lemonade
Chocolate Fudge Cupcakes

Chocolate Fudge Cake with Chocolate Frosting a.k.a  "Nikkunna" Nina Cake 
Zara Cake 1
I took a good couple of days to relax & recover from having hosted two parties in under two weeks right after getting back from India. September has flown by and now that Jobin is in India on work for two weeks, I am sure October is going to fly by as well!

I have a little news to share...I have started an online boutique, so feel free to follow my Instagram account here. I am really excited that I can  still keep in touch with my textiles background this way!

Friday, April 12, 2019

THAKKALI PACCHADI

Thakkali Pacchadi
Iam a huge fan of Pacchadi. The only Pacchadi that I grew up eating was the one made with Vellarikka which Jaanu Chechy made for us occasionally. It is also known as 'Banni' in Kannur. Jaanu Chechy is an expert at making Vellarikka Pacchadi & Kannur style Meen Curry that whenever we get a chance, we ask her to make it for us. Even now, whenever I go home the request never stop! If she is coming home to help, chances are that there will either be her Meen Curry or Pacchadi on the table by lunch time!

Thakkali Pacchadi
Later when I was in college, Mini aunty would make her special Paccha Manga Pacchadi for lunch which was extremely delicious! I would literally eat just that and maybe a spoonful of rice. It's made very differently from the way Jaanu Chechy made hers. It did not have the ground coconut & mustard paste in it.  So I used to be confused as to why it was called a Pacchadi!

Thakkali Pacchadi
When I moved to Minnesota, I've seen many call the usual salad that we serve for Biriyani, the raw onion-tomato-green chilli- yogurt kind of salad as Pacchadi. So basically a Pacchadi can mean different things to different people depending on where you were raised! :-) I got this recipe from 'Ente Tharavaadu Pachakam', a cookbook Amma gifted me close to a decade ago. It's the second most used cookbook in my collection, the first being Amma's handwritten family favourite recipe book for me.
THAKKALI PACCHADI
Thakkali Pacchadi Serves 4-5

Ingredients:
1 large tomato, diced
1/2 - 1 teaspoon red chili powder
1/4 teaspoon turmeric powder
A sprig of curry leaf
Salt
1 cup water

Grind together:
1/2 cup grated coconut
1/2 teaspoon black mustard seeds
1/4 teaspoon cumin seeds

1/2 cup thick plain yogurt

Tempering:
1 tablespoon coconut oil
1/2 teaspoon black mustard seeds
1 sprig curry leaves
2 dried red chilies

Method: Into a saucepan, add the tomatoes, red chili powder, turmeric powder, curry leaves, salt and water. Bring it to a boil and let it cook for 6-8 minutes or until the tomatoes are cooked and very soft. In the meantime, grind together grated coconut, mustard seeds & cumin seeds along with some water to a very fine paste. Add the yogurt and blend it for 30 seconds.
Once the tomatoes are cooked, add the ground coconut - yogurt mix to it and cook stirring continuously over low heat till the mixture begins to steam. Turn off the heat and set aside. Do not let it boil or else the mixture will spilt and it will look ugly.
In a pan, heat the coconut oil and pop the mustard seeds. Add the curry leaves & dried red chilies, give it a quick stir and pour it over the pacchadi. Adjust salt and let it sit, partially covered for 1-2 hours for the flavours to meld.
I made this for us just yesterday and now that Vishu is just around the corner, I thought I'd share this recipe with you all. This is a very easy side dish to make but you need to be careful about not letting the mixture boil. Once it splits, it looks ugly even though it will taste just fine. So just keep stirring it and as soon as the mixture begins to steam, turn off the heat. If you'd like, you can continue to stir it for another minute so that the residual heat doesn't let it split. I do that especially when I make Moru Kachiyathu where it's mostly yogurt.
We love this with Matta rice and a thoran on the side. I prefer to make Pacchadi a few hours before serving time,so that the yogurt gets a chance to turn a little sour. It kind of makes the Pacchadi taste even better, especially when you make it with Vellarikka.

Wednesday, April 10, 2019

CHOCOLATE & ORANGE LEOPARD BREAD

Chocolate & Orange Leopard Bread
This bread has been on my mind for atleast 3 years now. Everytime I've seen it, I wanted to try making it at home. Somehow, it got pushed until yesterday. There are so many different ways that you can make such breads and this is the most easiest pattern. Atleast that's what I think.The delight & excitement that I felt while slicing into it was incomparable! I really felt like a little child then. I must also mention that this recipe is eggless and does not use any food colouring!
Chocolate & Orange Leopard Bread
This bread is sweet,not very sweet but it is sweet if you compare it with storebought bread. I somehow felt that it's a cross between a cake & bread. The entire process of making this bread using this recipe was fun for me. I feel it would make a perfect activity for kids especially on a rainy /snowy day. Talking about snowy day...we are having a snow storm right now. Just when it touched 68F the other day and after 3 weeks of good weather...when the trees and plants have started to sprout! Hmm...that's how our sweet Minnesota is...unpredictable! I still remember the weather on Ian's First birthday party. It's usually pretty hot in July but that day, it went down to 40's! We had the party outdoors in a park and all of us ended up wearing jackets!
Chocolate & Orange Leopard Bread
Getting back to this wonderful bread...try it on a day when you need a 'pick-me-up'. It will definitely make your day! I don't know how it will taste if you omit the orange from this recipe. Initially, I did not want to but after tasting it, I felt that it was a good addition. It could be because I like orange in my baked goodies. I do not enjoy fruit filled chocolates though. I can never get myself to like them.
Chocolate & Orange Leopard Bread
When you read the instructions below, it can look a bit confusing at first. It's one of the simplest things to make in reality. You make one dough, divide it into three. Then you are basically rolling them and wrapping them around each other to form a sausage shape. Then you further roll them into long ropes, cut it, stack it and bake. You don't even need an egg wash for the top! It gets golden as it bakes.
CHOCOLATE & ORANGE LEOPARD BREAD
Chocolate & Orange Leopard Bread Makes one loaf

Ingredients:
1 cup warm milk
2 tablespoons (25 g) cornstarch
1 1/2 tablespoons (15 g) yeast
2/3 cup (70g) sugar, divided
4 tablespoons unsalted butter, melted & cooled
1 teaspoon vanilla
2 tablespoons orange zest
3 cups (375 g) all purpose flour

Dark chocolate paste:
2 tablespoons cocoa
1 tablespoon milk

Light chocolate paste:
2 teaspoons cocoa
1 teaspoon milk

Method: In the bowl of your standmixer using a dough hook, whisk together warm milk, cornstarch, yeast, 2 tablespoons sugar and set it aside for 6-8 minutes till it turns frothy. Add the melted butter,orange zest, vanilla extract and turn on the mixer on low speed. Add the flour by the cup and let it mix on medium high speed until it forms into a dough. Turn off the mixer and let the dough rest for 10 minutes. Then turn the mixer on high speed and knead for 8 minutes. Divide the dough into two equal portions. Let's name it A & B. Divide B two equal portions. Now you are left with three dough balls. A, B & C.

Make the dark & light chocolate paste by mixing together the given amount of cocoa and milk  in a small bowl. Tint dough B with dark paste and dough C with light paste. You may have to knead the dough for 2-3 minutes by hand to get them in a uniform colour. Wrap A, B & C in plastic wrap and chill for 1 hour.
After 1 hour, take out the dough balls and further divide each into 7 equal portions. So now you have 21 dough balls.

Using your hands, roll out the light brown dough into hot dog shapes, about 4 inches long. Set them aside.
Using a rolling pin, roll out the dark brown dough into a flat oval and wrap each of them around the light brown hot dog shapes. Use water to seal the edges.
Using a rolling pin, roll out the white dough into a flat oval and wrap each of them around the dark & light chocolate rolls. Use water to seal the edges.

Now you have 7 tri-coloured rolls. Using your hands, roll each of them into atleast 14-15 inch long ropes and cut them into the two. You will be able to see the beautiful pattern now.
Transfer them into a lined 8 X 5 inch loaf tin by stacking them on top of each other. Cover it with a tea towel and let the dough rise until doubled, till the top of the tin.
Preheat the oven to 375F and then reduce it to 350F as you put the bread in. Bake for 35-40 minutes. Let it cool in the tin for 5 minutes and then unmould the bread and let it cool completely on a wire rack.
Slice and enjoy!

I've tried my best to simplify the instructions. If you have any questions, do let me know in the comment section below.
We really enjoyed the bread. Ian was the only one who didn't like it. I am guessing he didn't like the chocolate-orange combination. Other than that, I must say it was a success! Zara calls it the Tiger Bread! :-) I cannot wait to try other designs now. It's really an exciting process, you should try it to experience it!

Tuesday, April 2, 2019

BREAD VADA

Bread Vada
I
don't know about you but I love Teatime! It's something we always cherished at home and I am trying my best to continue that tradition in our house too. I admit that it's a lot of work because it kind of happens right after you are done with the lunch clean up. It used to be a subtle affair earlier but now as the children are growing up, their appetite seems to be growing at lightening speed! No matter what I cook and how much I cook, everything gets over in no time at all.
Bread Vada
These days, I say a silent prayer while I cook. A one line prayer for the food to stretch for another meal so that I don't have to cook four times a day, everyday! So back to the topic... I cannot do a subtle Teatime anymore. It's full on...Boost, Tea, Coffee and sometimes even a glass of Green Juice for the little lady! Then the food. I honestly thank heavens because I enjoy cooking. If not, I would have walked out of the house already! :-)
Bread Vada
No one asks for it but if I make something around Teatime, it vanishes in two seconds. So I know, everyone is hungry! I try to make different things for 'naalumani' so when I came across this recipe by Lakshmi Nair, I made a mental note to try it sometime. Now that Jobin's mummy is with us, it's even more exciting to plan and execute THE snack for the day.
Bread Vada
While I was frying these vadas, Jobin reached back home from work and I immediately asked him if he could make some tea for us to sip while munching on piping hot vadas. While we were hankering around the stove, I told him about my prayer these days. He laughed and said that there's no way that the food I make can last long! I mean, seriously? But why? :-( He was like please don't even think that you can cook one day per week and stretch that food...because we LOVE to eat! I agree, all 4 of us live to eat.
Bread Vada
I sometimes dream of having a help in the kitchen like how Amma has. Like, there are days when I don't feel like touching another dirty cup! There's no paid help in our house and we do every chore ourselves. Kids have designated jobs to do everyday and they do it, luckily without hesitation.  Now that Spring is here, it's going to get extra crazy with ALL the yard work that's waiting for us outside. We have a huge wooded/ private backyard which is extremely beautiful throughout the year but maintaining it is work. When I am gone to India in Summer, Jobin is left with all the work in and around the house and he tells me that it's exhausting. I agree. But the satisfaction that you get when you do it for yourself is something worth experiencing!
Bread Vada
BREAD VADA
Bread Vada Makes 12-14 pieces

Ingredients:
10 slices white bread, crumbled
1 cup yogurt,whisked
2-3 tablespoons water
1/2 cup rice flour (puttu podi)
4 tablespoons semolina
1 medium onion, diced
2 green chilies, diced
1 inch piece ginger, diced
1/4 teaspoon baking soda
Cilantro, as needed
1 small sprig curry leaves, torn
Salt
Oil for deep frying

Method: In a large bowl, mix together the bread, yogurt and water and set it aside to soak for 5 minutes.In the meantime, heat the oil for deep frying. After 5 minutes,add the remaining ingredients to the soaked bread mixture. It should be like ' Uzhunnu Vada' consistency. Basically, if you scoop some batter in a spoon and tap the spoon, it should fall back into the bowl. If needed,add just enough water to get to that consistency. Wet your palm, pinch a small ball out of the batter, pat into the palm, mark a hole in the centre and gently drop it into the hot oil. Fry till golden on both sides,about 2 mins. Drain excess oil on tissue paper and serve hot!
It's a quick snack that you can make with easily available ingredients. Even though it doesn't taste like 'Uzhunnu Vada' it's a nice crisp snack with a faint sweetness from the bread and heat from the green chilies.You can serve it with Ketchup or any other spicy sauce of your choice. We really enjoyed it and as usual it vanished in under 5 minutes!
Related Posts Plugin for WordPress, Blogger...