Ria's Collection

Monday, March 14, 2011

LET'S PICKLE SOME CHICKEN!

IMG_0949

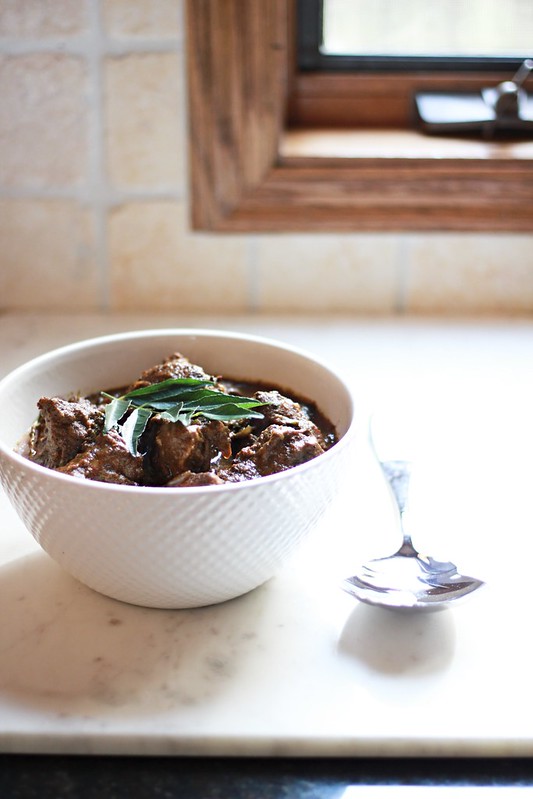
I don't know how many of you have heard of  non -veg pickles, but I have and I LOVE them! I have eaten only beef ,fish and prawn pickle until I got married. When Jobin's mom visited us last year,we got to taste some delicious pork pickle. The last batch was getting over and Jobin suggested me making some more, to replenish the stock :-) Me as usual wanted to try something new and thought about pickling some chicken and chicken pickle it was!
Chicken Achar

My first pickle was a Stuffed Green Chilli Pickle and it was delicious. If my memory is correct ,it was followed by a garlic pickle. Now, after almost 3 years I am back with pickling something.I am making another 3 batches today...it's really good, really addictive!
IMG_0958

I had a recipe with me for sometime now but cannot recollect it's source.The best thing with this recipe is that, it's very easy and the only time you need is to fry the chicken and in the meantime you can prep the rest of the ingredients. It's a breeze! It tastes so good that it can be a good substitute for your Chicken curry :)
Chicken Achar

I have to hunt for empty bottles now...all these months I have been hunting for bottles to store my Homemade Grape Wine and now I have plenty of them :-D Our friends still ask me if I need bottles for wine and now I say,'No, thank you!' as I have to find storage space for them :-) If you are re-using bottles like I do, make sure you wash it very well and let it dry completely otherwise you will have weird looking white stuff growing over your pickle :)

IMG_0949KOZHI ACHAR/ CHICKEN PICKLE

Ingredients:
1/2 kg boneless chicken,cut into 1" pieces
1 tsp pepper powder
1 tsp mustard seeds
1c shallots/chumnulli sliced fine
2 tbso ginger, chopped
2 tbsp garlic,chopped
2 sprigs curry leaves
Salt to taste
3 tbsp red chilli powder
1 tsp turmeric powder
1 tsp asafoetida powder
1 tsp fenugreek powder
1 1/2 tsp garam masala

1 c gingelly oil ( I used canola oil)
Vinegar to taste

Method:
Wash,clean and drain the chicken .
Add salt and pepper powder and let it marinate for 1 hour.Deep fry till the pieces are crisp &brown in colour. If you fry it crisp, shelf life will increase. This will take about 20 minutes.Reserve the pieces.
In the same oil, pop the mustard seeds. Then add shallots,ginger, garlic & curry leaves one by one, giving a minute gap between each. Saute well.
Lower the flame and add the powders and mix well till the raw smell goes.
Add the deep fried chicken pieces to it and mix.Add vinegar to taste. Check for salt. Once it is cooled, transfer it to a clean bottle and use after one week.

* If at all you need more gravy, add some boiled and cooled water. 


Verdict: Absolutely delicious! Make a big batch because you are going to need it!

I am sending this to The Kerala Kitchen hosted by Magpie of Magpies Recipes. This time we are having a small challenge for those of you who are interested in Kerala Cuisine...to make my 12- layered Chatti Pathiri. So if you are ready, write to us at magpiemails AT gmail DOT com.

Friday, March 11, 2011

LEMON SQUARES... so tangy that it will make you smile!

Lemons
Having never tried a Lemon Bar before I greedily happily reached out for one when Becky offered. I love whatever she cooks/bakes. Mike and Becky (who is a ballerina and is busy writing her first book!) are our friends in Minneapolis, who are more like family to us. We are there for all American Holiday dinners and we are fed upto our nose ! Their whole family talks about food all the time...just like the way I like a conversation to be! :)
Lemon Squares

On the way to their house, Cory, their son mentioned to me that Becky had baked the most tangiest lemon bars ever and that it was really really good! I couldn't wait till I reached their house :-D My eyes lit up as soon as I took a bite as it was really tangy that I got some weird sensation crawling up my jawline...the exact same one when I suck on a piece of Tamarind.I went for another bar...it was really good. It has a lovely buttery shortbread base topped with a tangy lemon layer. It had a beautiful yellow colour too...very pretty!
Lemon Squares
Becky mentioned she got the recipe from 'Byrely's' book and she was so gracious to share it with me. They are such a fantastic bunch of people. Becky has been trying out some of my recipes, one being the popular Chatti Pathiri and the other one being the Apple Chips. She's tried a Pear version too, which is equally fab! You just wouldn't miss munching on Potato Chips when you have Apple Chips!
IMG_1518
So without much talking (any further), let me share that delicious recipe with you. I couldn't stop licking the lemon layer which is sticky and it will stick to your fingers when you are cutting and transferring them to a plate.

IMG_1525LEMON SQUARES
Recipe source: Becky the Ballerina
Original recipe: Weekend Baking  by Sarah Randell

Ingredients:
Shorbread crust:
3/4 c all purpose flour
1/4 c powdered sugar ,plus extra for dusting
5 tbsp unsalted butter, chilled and cubed

Lemon layer:
3 large eggs
1 1/3 c sugar
Zest of one lemon
2/3 c lemon juice, freshly sqeezed
1/3 all purpose flour

Method:
Oil a 7 inch square tin. Pre-heat the oven to 350F.
Place 2 wide strips of baking parchment from one side of the pan to the other so that they form a cross (to aid in lifting out). Place a square of baking parchement on top of the strips as you would normally to line bottom of a pan.

Crust:
Put flour, sugar and butter and mix together with fingertips to resemble breadcrumbs. Tip the mixture into the prepared pan and press down firmly with your fingers. Poke holes in it with the tines of a fork and bake for 12-15 mins or until golden brown.

Lemon Layer:
Beat the eggs, sugar and lemon peel together for a minute.Gradually pour in the lemon juice while the beaters are still on.Stir in the flour* and pour over the baked shortbread base.
Lower the oven temperature to 300F and bake for 45 mins. The lemon layer will be set with a crust on it.
Let it cool completely. Cut them into 16 squares and dust with powdered sugar.

*I think I stirred quite a lot after adding the flour which created some foam over the batter. I think that's the reason why my crust is so pronounced.So don't get very excited like me and stir like there's no tomorrow. Here, moderation is the key ;-)
Lemon squares

Verdict: We simply love them! That's it! :)

My heart goes out to all the Tsunami & Earthquake victims in Japan. I hope all of you who are living on the Pacific coast takes necessary precautions and stay safe!

Wednesday, March 9, 2011

CINNAMON ROLLS...tops my current fave list!

IMG_1479

I've always complained about American goodies having a lot of Cinnamon sprinkled on them. Whatever I pick to eat, it has cinnamon. Whatever I order to drink, they sprinkle cinnamon over it. I used to tell Jobin it was one of the most misused spice here and there was a phase that I just couldn't bear it anymore.I used to frown at anything with Cinnamon in it, except for when it is used in Indian cooking,which is subtle.
IMG_1460

2 weeks ago, we had gone to a lovely cold place called Duluth and on the way we stopped by Tobies ,a restaurant cum bakery in Hinckley,MN. We were told by a person in church that they are the best place to stop for brekky and that they also sell Cinnamon Rolls and Caramel Rolls if we needed a quick grab. I frowned again. Too much Cinnamon, I say! Anyhow, we reached there and I was bowled over by their food! It was so old-fashioned.The waitresses were all 80+ and they were so kind and the entire restaurant was filled with the aroma of freshly baked breads, rolls, cookies, cakes and deep fried doughnuts! I was immediately transported to the Enid Blyton's Famous Five Era...all those homemade stuff she mentioned in her books had me drooling all these years, even today!
Sin-a-mon rolls
On the way back, we stopped at Tobies once again for a late lunch. I couldn't hold on to it anymore, I had to taste some of their baked stuff.When I went to the counter, I could see a long line of waiting customers who came to buy their Cinnamom Rolls and I thought,' Now what's with this Cinnamon Rolls everywhere?Maybe these people like the strong Cinnamon flavour because they must have grown with it!'.
IMG_1480
Anyhow, the foodie in me persuaded me to go join that line to buy their famous Cinnamon Rolls. I was so hesitant to take a bite thinking I might end up having a headache...but boy! I was proved SO wrong! They were so so good that me and Jobin were literally fighting over that one roll. It got over even before we got onto the highway!
IMG_1461
From that day on, it haunted me...Cinnamon was sprinkled over my dreams too! I had to make it somehow and the other day, I finally did.I'm so glad that  I have a recipe now to look upto when I crave for these yummy rolls.
Sin-a-mon rollsSINFUL CINNAMON ROLLS
Recipe source: All Recipes

Ingredients:
1/2 c milk
1/2 c water
2 tbsp butter
3/4 tsp salt
3 c all purpose flour
2 1/4 tsp yeast
1/4 c sugar
1 egg


3 tbsp butter, melted
3/4 tsp ground cinnamon
1/3 c sugar 

  • For the frosting:
  • 1 c powdered sugar
  • 1 1/2 tbsp melted butter
  • 1/4 tsp vanilla extract
  • 1 1/2 tbsp milk

Method:
In a saucepan , heat milk,water and butter till very warm.
Mix together the dry ingredients and break the egg into it. Pour the milk mixture and stir to form a sticky dough. You can just break up the egg while you mix everything together. Let it rest till the dough doubles in bulk (about an hour or so).
Punch down the dough and roll it out into a rectangle (keeping it parallel to the counter edge) on a floured surface. It will be a long rectangle and that's how we want.
Mix together the cinnamon and sugar.
Pour the melted butter over the rolled out dough and spread it out using your fingers. Slather it!
Sprinkle over the cinnamon sugar,evenly.
Roll the dough in a jelly/jam roll fashion from the longer side towards you.Pinch the ends together. Cut them into circles and lay them flat on an 8"square baking tray.Let it rise for 45 mins or almost doubled.
Pre-heat the oven to 375 F and bake the rolls until golden, 20-25 mins.
Meanwhile make the frosting by mixing all the ingredients together.
Once the rolls are baked and are out of the oven, let it cool for 10 mins. Pour the frosting over it.
Enjoy!
IMG_1465

Verdict: My fingers,toes and eyes were crossed when I was making it because I really wanted to replicate that same thing in my house.I didn't eat the first one, I made Jobin eat it and hear what he had to say. I was standing by his side and pestering him to tell me if it tastes like Tobies and he said ' Athinte ezhu aiylokkathu koodi poyitilla'! (it has not even gone anywhere close to it).
Then he smiled and said,'It's good!'. I was a happy girl! When I had mine, I wanted that fresh out of the oven feeling, so I microwaved it for 15 seconds and boy! It was really really good!!

Try it if you have tasted one before and liked it.Try it if you have never tasted one before but always wanted to.Just simply try it, you will like it for sure!

I must mention that your house will smell like a bakery when you bake these soft,delicious cinnamon rolls!
These rolls are Yeastspotted!

Monday, March 7, 2011

EGGLESS WHOLEWHEAT ALMOND COOKIES

Eggless Wholewheat Almond Cookies
This cookie has been baked over and over in my kitchen for the last 4 months. It's gone places along with me for the last 4 months.It's first trip was to California and now to our friends houses in Minneapolis.It's such an easy recipe with beautiful crunchy results! I remember posting a picture of it on Facebook, but never got to posting it here. Time and month's flew by and when it was time for me to select a 'Cookie' for 'A Sweet Punch' bake for February, I chose these simple Indian cookies.
Eggless Wholewheat Almond Cookies

Are you longing to get a taste of your local bakery cookies? Are you longing to have a bite of 'those' crunchy cookies your mom made when you got back from school? Or simply want to have something with a nutty crunch in it? Then these cookies can do wonders for you! I tried them simply for a change and not for wanting any of those things I mentioned above but I got all those things I mentioned above when I ate them :)
EWAC

When we went to California, I met a blogger friend of mine.Magpie of Magpie's Recipes. I gave her a packet of these cookies and she loved it. Infact she has been asking me for this recipe ever since and I've never shared it with her! How mean?! ;-) The truth is,I've had plans of posting it on my blog but it never happened until today. I hope she gets to see this now :)

Eggless Wholewheat Almond cookiesEGGLESS WHOLEWHEAT ALMOND COOKIES
Recipe source: Manjula's Kitchen

Ingredients:
1 c Wholewheat flour
1/2 c granulated sugar (If you are living in India, please use powdered sugar.Take about less than 1/2 cup regular sugar and powder it.)
1/4 tsp salt
1/2 tsp green cardamom powder
1/4 c chopped/slivered almonds
1/2 c (1 stick) unsalted butter, room temperature
About 2 tbsp milk or as needed (you may not need this at all)

Method:
Pre-heat the oven to 360F and position the rack in the centre.

In a bowl, whisk the dry ingredients together.
Add the soft butter to the dry ingredients and mix with your fingertips.
If can form a soft dough, avoid adding the milk, if not add milk and form a soft dough.
Divide the dough into 24.Form them into smooth balls.
Flatten them slightly and place them on an ungreased cookie/baking tray.
Bake for 18 mins or until they are lightly golden brown in colour.
Transfer the cookies to a cooling rack to cool completely, by then the cookies will firm up.
Store in airtight containers.


Verdict: If I make the same cookies over and over again and then bring it to a group of food bloggers to try, then this recipe has to be excellent! :) Try it for yourself and see!!
Eggless Wholewheat Almond Cookies

If you would like to bake with us, please send an e-mail to asweetpunch AT gmail DOT com

Announcement: A big thanks to all who participated in the Kerala Kitchen last month. We have created a new home for the event, so the round up will be posted there. This month,along with the event, we are bringing you a challenge, to make my 12-layered Chatti Pathiri :)
If you are interested in becoming a member or would like to submit your entry, please send it to magpiemails AT gmail DOT com.
We look forward to hearing from you, real soon!

Wednesday, March 2, 2011

AFGHANI RUZ BUKHARI...talk about inspiration!

Afghani Ruz Bhukari

Remember Murgh Methi Malai? That creamy creamy delicious chicken curry? That same sweet lady, Bindu shared another favourite recipe of hers with me. Infact I shared it with another blogger friend of mine,Prerna of Indian Simmer and we both decided to make it and post it together on the same day, which is today :) I'm sure most of you know Prerna, because she takes gorgeous photographs of all that she cooks and it just spells out DELICIOUS!
Afghani Ruz Bhukari

I had this recipe with me for sometime now and was wondering where to get the 'Sela' basmathi rice from. Bindu mentioned that it is the only rice known to the Afghanis and it is absolutely necessary that we use the same for this Birinj (Biriyani).That's when Jobin reminded me of the Middle Eastern Market that we have closeby. I never thought about that store because we usually get all our 'desi' stuff from the Indian store. So after the celebration of 500,000 hits we went to that store and got a bag of Sela Basmathi rice. It is quite pricey as compared to the regular Basmathi rice.When I got back home, I wrote on Bindu's FB wall about this and that set off a lot of question- answer session  which got to Prerna's attention.That's how we ended up having a conversation about it and decided to cook and post it together. I'm so glad we did it because good things are meant to be shared!
Afghani Ruz Bhukari

If you ask me the difference between Sela basmathi rice and our Indian Basmathi rice, I would say, they are almost the same but not completely the same! Sela basmathi rice is a bit more full bodied and has a very very pale yellow colour as opposed to our Indian Basmathi rice. I wouldn't even have noticed the colour if it wasn't for Bindu telling me :-) She says it's impossible to make this with our basmathi rice, but I feel you can. I'm a person who believes a lot in substitution because I did a lot of that when I was in India. If I make it with our regular rice, I will update you all. In the meantime, if you guys do that, please let me know :)

Afghani Ruz BhukariAFGHANI RUZ BUKHARI/BIRINJ
Built on the recipe provided by my dearest Facebook friend, Bindu .

Ingredients:
1 kg 100 g Sela Basmathi Rice (measure the rice in cups later)
Water (2 x no.cups of rice) (For 1 cup or rice, we need 2 cups of water)
1 kg Goat meat/Mutton (with bones) cut into 2 inch cubes
1/2 c Canola/vegetable oil
1 large Onion halved , halved again in the centre and sliced fine
1 large Tomato, pureed
2 large carrots, sliced fine (no grating please, it will turn mushy)
1/4 c black raisins, soaked in water for 15 mins
Salt to taste

Method:
Pre-preparation:
Wash the meat and let it drain for atleast 6-7 hours, preferably in the fridge(yes, the meat with the draining apparatus et all)
Wash and soak the rice for a couple of hours. I soaked it for 3 hours.
Cooking the Birinj:
Heat oil in a heavy bottomed pan and add the mutton/goat pieces .Fry till the pieces no longer stick together and all the water which oozed out from the meat has evaporated. Add the onions and saute till they are soft and translucent.
Add the measured amount of water and salt.Let the meat cook completely. This will take about 20-25 mins.
Once the meat is cooked, we need to start layering.Remove the pieces and reserve the stock.
Put a thin layer of soaked rice in the bottom of a pan (with tall sides).
Put the meat over it. Next, arrange the sliced carrots and raisins over it.
Put the remaining soaked rice over it, it will be a very thick layer.
Pour over the reserved mutton stock and top it up with some more water so that the water level is atleast 2 inches above the rice layer.
Add the tomato puree and just simply stir it around carefully in the water which is above the rice.


Take a sheet of aluminum foil, fold it up and fit it on the rim of the vessel which hold the rice. Now put the cover over it and place the whole thing on another flat bottomed pan (I completely forgot about this and ended up covering it with my lid alone and it worked just as fine!)
Switch on the gas/stove and let the stock/broth come to a boil.As soon as it boils, reduce the heat to a medium-low and cook it for 15 mins (Set the timer!).After 15 mins, switch off the stove/gas and leave it for 5 mins. By then all the water would have been absorbed and the rice would have cooked perfectly. You can just slide in a ladle through the side all the way till the bottom of the pan and pull it out to see if there is any water left. 99% you will have it dry but if that 1% is strong, leave it on the stove for another 5 mins or so.
When you are ready to serve, dig all the way down and pull it out together as it is a layered dish and you want everything to come out in one go :-)

Verdict: When Bindu gave me this recipe the most catchy thing that she said was,'If you think a biriyani cannot be made without garam masala,you will be proved wrong!' and that was it, I had to try it out!

I'm so glad  We are so glad that I tried it because it's definately different and it tasted really good. It is a LOT different from the usual Biriyani because of the absence of garam masala, green chilli etc. So don't go ahead and make this if you are craving for the usual Indian Biriyani. The mutton broth flavoured the rice so well and the sweetness from the carrots and raisins added to the taste. This made an enormous quantity for just the two of us so I froze them in ziplock bags. It comes handy on those lazy evenings when you don't feel like cooking anything. When you re-heat it, do that in a microwave oven or try steaming it and not directly in a pan. If you are microwaving it, sprinkle some water over it so that it remains soft and not dried up.

Tuesday, March 1, 2011

MEEN VEVICHATHU / KERALA STYLE RED FISH CURRY

Meen Vevichathu
Kerala style fish curry could be made in millions of ways because each household has a recipe of their own! How diverse can we get ? :) This recipe is the way Amma makes Fish Curry at home so it has the Alleppy- Kottayam- Changanaserry style in it and it is DEELICIOUS! I cannot emphasize enough on that because I haven't had many fish curry's which tastes as good as hers.

Now that was the red colour fish curry made with Kokum/Kudampuli. The place I grew up,Kannur, has another take over fish curry. It's yellow in colour and is made with Sambar puli/Tamarind and also has ground coconut in it. Trust me, I can drink that curry and I have done so! It is so tasty but I have never tried my hand at it which I will, very soon! Janu chechy, our maid at home for the last almost 30 years makes the best Kannur Meen Curry/Fish Curry. She is really old and I don't think she can see clearly anymore but when she makes the fish curry, it is just WOW! I also love her 'Pacchadi' and had written it down in my diary as Janu chechy's Pacchadi :-)
Meen Vevichathu

This particular red colour fish curry, which I will refer to as Meen Curry now on is not that easy to master. I think the main problem comes in balancing the 'puli'/tanginess with salt. My first attempt at it was in 10th standard and I produced a decent curry. I don't even remeber how it tasted because along with that curry I had made 33 others too. It was for a competition at the District level from school that I had participated in. We had to cook as many dishes as possible in 3 hours using a Kerosene stove and nutritious ingredients. There was no way that we could use a pressure cooker to speed up the process.It had to be a balanced meal and we had to cook breakfast items, lunch items, 4'o clock tea snacks and dinner items, in 3 hours! I managed to make the most number of dishes (34) which included varitey of Puttu,Fish curries,Sambar,Banana Fritters etc. I don't even remember the list as it was 10 years ago!
Meen Vevichathu
My recent attempt at it for the first time after wedding was a half flop, according to me. I really didn't like the colour of the curry, it was orangish and not the maroon red I wished for. Jobin and his mom said the curry tasted fine but I just couldn't accept that I couldn't cook a basic Meen curry properly! The second time, I paid more attention to it plus Amma's tip of 'sauteeing the masala more' helped tons! I got the beautiful colour and taste since then! So I thought it's time for me to share the recipe and confidence with you all, especially for you guys who are struggling to make a decent Meen curry :-) I know that struggle because I just got over it :-)
Meen Vevichathu
MEEN VEVICHATHU
Recipe source: Amma

Ingredients:
1.5kg fish (I used King Fish/Neimeen/Aikoora. You can use any fish of your choice)
1 small onion, chopped (If you have access to 'chumannulli'/Shallots use that, maybe 4-5 nos.)
2 tbsp ginger garlic paste
1/2 tsp fenugreek seeds/Uluva
2 sprigs of curry leaves
11/2 tbsp red chili powder (I use a mix of Kashmiri and Hot chili powder,Kashmiri gives colour to the curry)
1/2 tsp turmeric powder
2 tsp fenugreek powder
4 pieces of Kokum soaked in 1 c warm water (for 10 mins)
1/4 c Coconut Oil (you can substitute it with vegetable/canola oil)
1 c water (optional) for the gravy

Method:
Clean the fish thoroughly using salt and vingear and let it drain.
Heat oil and when it is hot add the fenugreek seeds . Let it change colour lightly.
Add the onions, ground paste ,curry leaves and saute till you get a nice aroma (1-2 mins)
Add in the powders and mix well and saute for 5-6 mins till the colour changes to a nice maroon.
Add in the 1 cup water and kokum +water and let it come to a boil.
Add the fish and swirl the pan lightly so that nothing sticks to the bottom of the pan.
Let it cook till the fish is done. Taste test it.
If you feel it's tangy (a little) , it's okay. Once the fish absorbs it in, it will be perfect.
If you feel it's a lot tangy, remove the kokum pieces from the curry . You can discard them.
This curry tastes better the next day .
Don't refrigerate the curry. Before you go to sleep, re-heat it and leave it to cool.
Next day morning, re-heat the curry again. This way, the gravy might reduce and will end up sticking to the fish pieces, which is heavenly! But if you want gravy, add some water when you boil the curry.

I never refrigerate the curry, I just re-heat it twice everyday till it is over :-)


Verdict: I am person who can live on Meen curry and rice alone and when I asked Jobin if he liked it the same way, he said 'No'! Infact he really doesn't like fish curry at all! I was devastated (exaggerated, I know!)

But remember that half-flop Meen curry I was talking about? He said he liked that curry and I was like,' This one? I made a real sad curry and you like that??'. Now things have changed and he is a convert,if I may say so :-) He likes Meen Curry now maybe not as much as Dal and Ladiesfinger fry!
Related Posts Plugin for WordPress, Blogger...